Sunday, July 12, 2015

wine for x86_64

Wine

Wine


이 문서는 e[ ⎋Esc ]m[ ⌥Meta ]a[ ⌥Alt ]c[ ^Ctrl ]s[ ⇧Shift ] org-mode로 작성된 글입니다.


System Environments

Operating Systems

  • Main- : OS X Yosemite (10.10.4)
  • Sub- : Debian GNU/Linux Wheezy (7.8):amd64
  • Server: Debian GNU/Linux Wheezy || Squeeze
  • Mobile: iOS 7.1.2

지난 글들에서 볼 수 있듯이, 최근에 Debian이 설치된 2nd 컴을 날렸다.

이 blog를 참고하는 것 만으로, 웬만한 설치 관련 문제를 해결할 수 있기를 바랐기에, 다시 Debian을 설치하며 알게 된 이 blog에서 빠진 몇 가지 간단한 것들을 추가하려 한다.

Wine for Debian GNU/Linux: amd64

Debian을 64비트(a.k.a. amd64, x86-64, or x86_64)로 설치해서 사용하고 있다. 믿기 어렵지만, 2015년이 반이나 지났는데도 아직 32비트가 확장성이 더 좋다. 이를테면, steam을 Debian 64비트에서 설치하는 것은 많이 까다롭거나 거의 불가능하다. 그럼에도 불구하고 이를 쓰는 이유는, 전적으로 내 경험 상 동영상 변환 및 시청에서 약간의 성능 향상을 경험했기 때문이다. 즉, 같은 환경에서 32비트보다 64비트에서 동영상 변환이 조금 더 빠르고 HD급 동영상 시청 시 덜 버벅였다. 사용하고 있는 컴의 아키텍처를 알고 싶으면 아래의 명령어를 Bash(or Terminal Emulator)에서 실행하면 된다.

$ dpkg --print-architecture

32비트면 i386 를 출력할 것이고, 64비트면 amd64 를 볼 수 있을 것이다.

Linux를 쓰다 보면 Wine이 필요할 때가 있다. 일반적으로 Linux 용 소프트웨어가 Windows는 물론 OS X 보다도 적다. 이를 다소 해결해 줄 수 있는 것이 Wine이다. Wine은 Windows 용 프로그램을 Linux에서 간단히 구동 시켜주는 emulator 중 하나이다. 대표적으로 MS Office나 iTunes 같은 프로그램을 쓸 수 있게 해주며, 게임을 즐기는 사람들에게 특히 유용하게 쓰인다. 내 경우에 Linux로 사용하는 컴이 너무 구식이라 어차피 게임을 돌릴 수는 없고, 2nd으로 쓰는 지라 웬만한 것들은 Linux 안에서 해결 수 있었다. 딱 하나 필요해서 쓰는 데, 그게 반디집이다. Linux에서 한글명으로 된 압축 파일을 풀 때 쓴다.

문제는, Wine은 32비트 아키텍처 기반이라 64비트에서 쓰려면, 32비트로 구동 되는 소프트웨어를 64비트에 이식하는 과정 이 필요하다는 점이다. 글로 쓰니 거창해 보이지만 간단히 말해서, 아래와 같이 foreign-architectures 에 32비트를 추가하면 된다.

  1. Bash(or Terminal Emulator)를 열어 다음 명령어를 수행한다.
    $ sudo dpkg --add-architecture i386
    
  2. 그러면, 다음 명령어로 foreign-architectures 에 32비트가 추가된 것을 확인할 수 있다.
    $ dpkg --print-foreign-architectures
    
  3. 마지막으로 apt 를 업그레이드 하면 된다.
    $ sudo apt-get update
    $ sudo apt-get upgrade
    

이제, Wine을 쓸 준비는 다됐다. 설치는 언제나 그렇듯 sudo apt-get install wine 으로 하면 된다.


Creative Commons License
This work is licensed under a Creative Commons Attribution-NonCommercial-ShareAlike 4.0 International License.
Created: 2015-07-12 Sun 00:19

Emacs 24.3.1 (Org mode 8.2.10)

Sunday, July 5, 2015

XFCE: auto-login

Debian GNU/Linux: Auto-login

Debian GNU/Linux: Auto-login


이 문서는 e[ ⎋Esc ]m[ ⌥Meta ]a[ ⌥Alt ]c[ ^Ctrl ]s[ ⇧Shift ] org-mode로 작성된 글입니다.


System Environments

Operating Systems

  • Main- : OS X Yosemite (10.10.4)
  • Sub- : Debian GNU/Linux Wheezy (7.8)
  • Server: Debian GNU/Linux Wheezy || Squeeze
  • Mobile: iOS 7.1.2

지난 글들에서 볼 수 있듯이, 최근에 Debian이 설치된 \(2^{nd}\) 컴을 날렸다.

이 blog를 참고하는 것 만으로, 웬만한 설치 관련 문제를 해결할 수 있기를 바랐기에, 다시 Debian을 설치하며 알게 된 이 blog에서 빠진 몇 가지 간단한 것들을 추가하려 한다.

Auto-login in Debian GNU/Linux with XFCE

KDE를 쓰면 [System settings]에서 auto-login을 간단하게 설정할 수 있다. XFCE는 가볍고 빠른 만큼 GUI(Graphic User Interface)로 간단히 접근할 수 있는 많은 것들이 누락되어있다. Auto-login도 그 중 하나로 사용자가 직접 Bash(Terminal emulator)에서 설정해야 한다. 내 \(2^{nd}\) 컴에는 개인적인 것들이 거의 없어서, 한 번 이라도 키보드를 덜 쓰려, 아래의 방법으로 auto-login on 상태로 사용하고 있다.

  1. 우선 lightdm package가 필요하다.
    $ sudo apt-get install lightdm
    
  2. 설치가 끝나면, /etc/lightdm/lightdm.conf 파일을 mousepad 같은 적당한 에디터로 열자.
  3. 아래와 같이 쓰여진 부분을 찾아서(⌃Ctrl+f)
    [SeatDefaults]
    #autologin-user=
    #autologin-user-timeout=0
    

    아래처럼 주석 처리 기호인 # 을 지우고, autologin-user= 오른쪽에 사용자의 ID(아래서 Your_ID 로 표한 부분)을 적으면 된다.

    [SeatDefaults]
    autologin-user=Your_ID
    autologin-user-timeout=0
    

Creative Commons License
This work is licensed under a Creative Commons Attribution-NonCommercial-ShareAlike 4.0 International License.
Created: 2015-07-05 Sun 12:41

Emacs 24.3.1 (Org mode 8.2.10)

XFCE: font installation

Debian GNU/Linux: Font installation

Debian GNU/Linux: Font installation


이 문서는 e[ ⎋Esc ]m[ ⌥Meta ]a[ ⌥Alt ]c[ ^Ctrl ]s[ ⇧Shift ] org-mode로 작성된 글입니다.


System Environments

Operating Systems

  • Main- : OS X Yosemite (10.10.4)
  • Sub- : Debian GNU/Linux Wheezy (7.8)
  • Server: Debian GNU/Linux Wheezy || Squeeze
  • Mobile: iOS 7.1.2

지난 글들에서 볼 수 있듯이, 최근에 Debian이 설치된 \(2^{nd}\) 컴을 날렸다.

이 blog를 참고하는 것 만으로, 웬만한 설치 관련 문제를 해결할 수 있기를 바랐기에, 다시 Debian을 설치하며 알게 된 이 blog에서 빠진 몇 가지 간단한 것들을 추가하려 한다.

Installation of fonts in Debian GNU/Linux with XFCE

폰트 설치 시, Debian repository에 있어서 apt 명령어로 바로 설치할 수 있는 경우가 있다. 대표적으로 은폰트(ttf-unfonts-corettf-unfonts-extra)가 있다.

그렇지 않은 경우로는, 사용자가 직접 폰트나 폰트 패밀리를 다운로드해서 설치하고 싶을 때가 있다. KDE나 Gnome과는 다르게, XFCE는 가볍고 빠른 만큼 GUI(Graphic User Interface)로 간단히 접근할 수 있는 많은 것들이 누락되어있어서 폰트도 사용자가 직접 몇 가지 명령어를 실행해야 한다. 이는 또 두 가지 경우로 나눌 수 있는데, 시스템에 설치해서 전체 사용자가 쓸 수 있는 방법과, 한 사용자(혹은 지금 로그인 중인 사용자)에만 설치하는 방법이 있다. 전자는 당연히 sudoer에 등록된 사용자만이 할 수 있고, 후자는 로그인만 할 수 있으면 가능하며 내가 선호하는 방법이다.1

  • Systemwidely:

    다운로드한 폰트나 폰트 패밀리를 /usr/local/share/fonts/ 디렉터리로 복사한 후, sudo fc-cache -fv 명령어를 실행하면 된다. 아래는 ~/Downloads/ 디렉터리에 받은 TrueType 폰트 전체를 /usr/local/share/fonts/ 디렉터리로 복사한 후, 해당 명령어를 Bash(Terminal emulator)에서 실행하는 예이다.

    $ sudo cp ~/Downdloads/*.ttf /usr/local/share/fonts/
    $ sudo fc-cache -fv
    
  • For an user:

    우선 다운로드한 폰트나 폰트 패밀리를 ~/.fonts/ 디렉터리로 복사한다. 이 디렉터리가 없으면 mkdir ~/.fonts 명령으로 하나 만들면 된다. 그리고 fc-cache -fv 명령어를 실행하면 된다. 아래는 ~/Downloads/ 디렉터리에 받은 TrueType 폰트 전체를 ~/.fonts/ 디렉터리로 복사한 후, 해당 명령어를 Bash(Terminal emulator)에서 실행하는 예이다.

    $ cp ~/Downdloads/*.ttf ~/.fonts/
    $ fc-cache -fv
    

FYI) .ttf 형식의 TrueType 폰트는 물론, .otfOpenType 폰트 모두 쓸 수 있다. 현재 각광 받는 폰트 중 하나인 Noto Sans CJK KR.otf 형식으로 배포되고 있다. -> 다운로드 바로가기


Creative Commons License
This work is licensed under a Creative Commons Attribution-NonCommercial-ShareAlike 4.0 International License.

Footnotes:

Created: 2015-07-05 Sun 12:42

Emacs 24.3.1 (Org mode 8.2.10)

Installation of Debian GNU/Linux with XFCE

Debian GNU/Linux: XFCE default

Debian GNU/Linux: XFCE default


이 문서는 e[ ⎋Esc ]m[ ⌥Meta ]a[ ⌥Alt ]c[ ^Ctrl ]s[ ⇧Shift ] org-mode로 작성된 글입니다.


System Environments

Operating Systems

  • Main- : OS X Yosemite (10.10.4)
  • Sub- : Debian GNU/Linux Wheezy (7.8)
  • Server: Debian GNU/Linux Wheezy || Squeeze
  • Mobile: iOS 7.1.2

지난 글들에서 볼 수 있듯이, 최근에 Debian이 설치된 \(2^{nd}\) 컴을 날렸다.

이 blog를 참고하는 것 만으로, 웬만한 설치 관련 문제를 해결할 수 있기를 바랐기에, 다시 Debian을 설치하며 알게 된 이 blog에서 빠진 몇 가지 간단한 것들을 추가하려 한다.

Installation of Debian GNU/Linux with XFCE

Debian GNU/Linux Wheezy (7.x)의 기본 Desktop Environment는 Gnome이다. OS 설치 시, Gnome, KDE, XFCE, LXDE 중 선택할 수 있지만, 어떻게 bootable usb를 만들었냐에 따라 Desktop Environment 선택 화면이 없이 그냥 지나갈 수도 있다. 보통 그냥 하라는 데로 설치하면 열이면 열 Gnome이 설치된다. 나는 Gnome을 좋아하지 않는다. KDE는 너무 무겁다. 내가 원하는 것은 XFCE. OS 설치 시 수동으로 XFCE를 Desktop Environment로 선택하는 방법은 간단하다.1

  • Bootable usb로 부팅한 후 바로 보이는 boot prompt에서, ↹Tab 키를 누른 후, desktop=xfce 를 타이핑한 후 ↩Return 키를 누르면 된다.

FYI) 내 경우, unetbootin 을 통해서 bootable usb를 주로 만드는데, 설치 시 Desktop Environment 선택 화면이 보이지 않는다. 다른 프로그램을 통해서 bootable usb를 만들면 이 화면이 보일 수도 있다. 이를테면, KDE에서 Startup Disk Creator 를 이용해서 만들면, boot prompt에서 [Advanced Options] 아래 Desktop Environment를 선택할 수 있다.


Creative Commons License
This work is licensed under a Creative Commons Attribution-NonCommercial-ShareAlike 4.0 International License.

Footnotes:

Created: 2015-07-05 Sun 12:41

Emacs 24.3.1 (Org mode 8.2.10)

Saturday, July 4, 2015

gif onto Flickr in OSX

GIF to Flickr

GIF to Flickr


This post is written with e[ ⎋Esc ]m[ ⌥Meta ]a[ ⌥Alt ]c[ ^Ctrl ]s[ ⇧Shift ] org-mode.


System Environments

Operating Systems

  • Main- : OS X Yosemite (10.10.4)
  • Sub- : Debian GNU/Linux Wheezy (7.8)
  • Server: Debian GNU/Linux Wheezy || Squeeze
  • Mobile: iOS 7.1.2

A way to upload a gif to Flickr in OSX

A GIF image is not officially supported in Flickr. Whenever you want to upload a gif into Flickr, it would give an error message back to you. There however would be a way to upload it. I'm not sure whether it's a bug or not, but it seems to work by now.

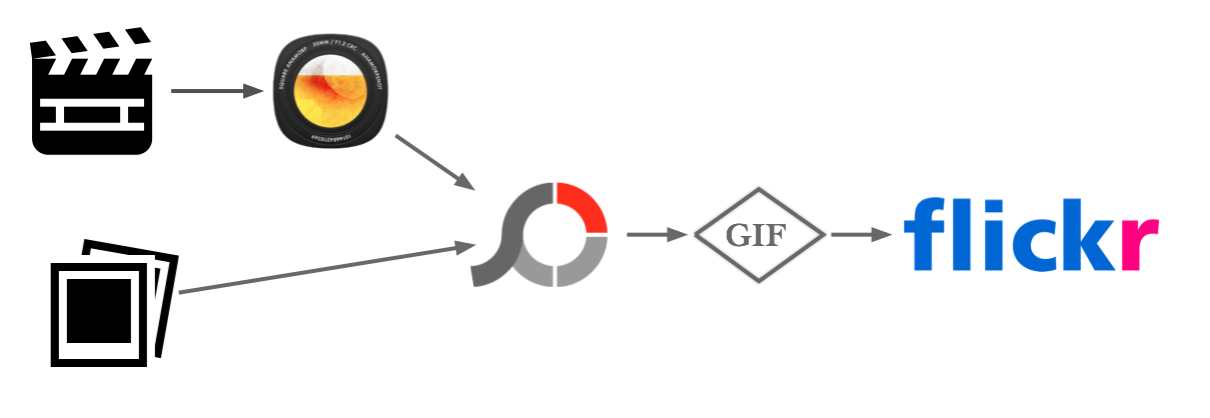
Here a way I want to show you is kinda a detour. The Key is PhotoScape X. It doesn't matter which software you used in order to make a gif in a first step. Once it goes through PhotoScape X after no matter how you made it, it can be oddly and interestingly possible to upload it to Flickr.

For example, I've made a gif file in two ways. One is from directly images by virtue of PhotoScape X. Another is first making a move via Screeny or QuickTime Player, and then a gif via GIFBrewery. If it is from a movie, then I use PhotoScape X even though it doesn't seem to be necessary. Everything I made has been succeeded in uploading it onto Flickr.

Long story short, if you use PhotoScape X at the end, then it is possible to upload it onto Flickr.

19215905630_2f6abc82a9_o.png

FYI) The reader should be reminded that

  • GIF Brewery is a commercial software. It costs you $4.99.
  • PhotoScape X is a free software and the latest version # is 2.2. But I recommend PhotoScape X 1.8 having no commercial appearing. The others including an AppStore for Mac version keep showing commercial.
  • PhotoScape X is highly beneficial to keep in you OSX, though it looks quite out of an OSX native app style.

Examples uploaded onto Flickr

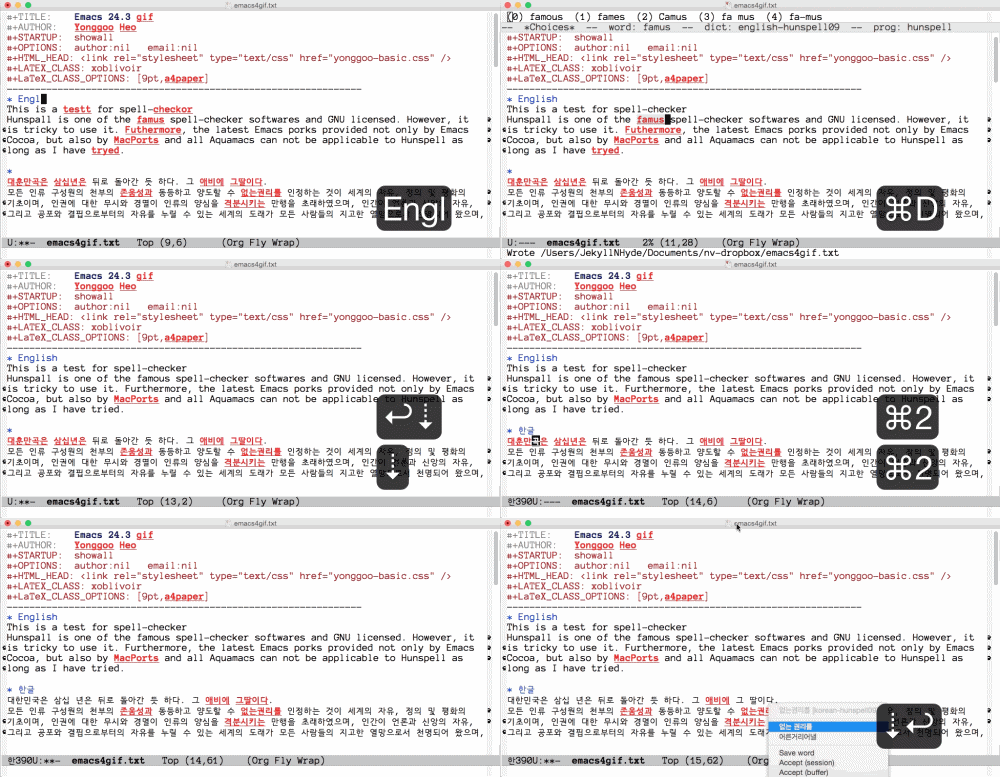
18279671760_cb3f05861b_o.gif

Figure 2: English/Korean spell-checker in Emacs 24.3, OS X

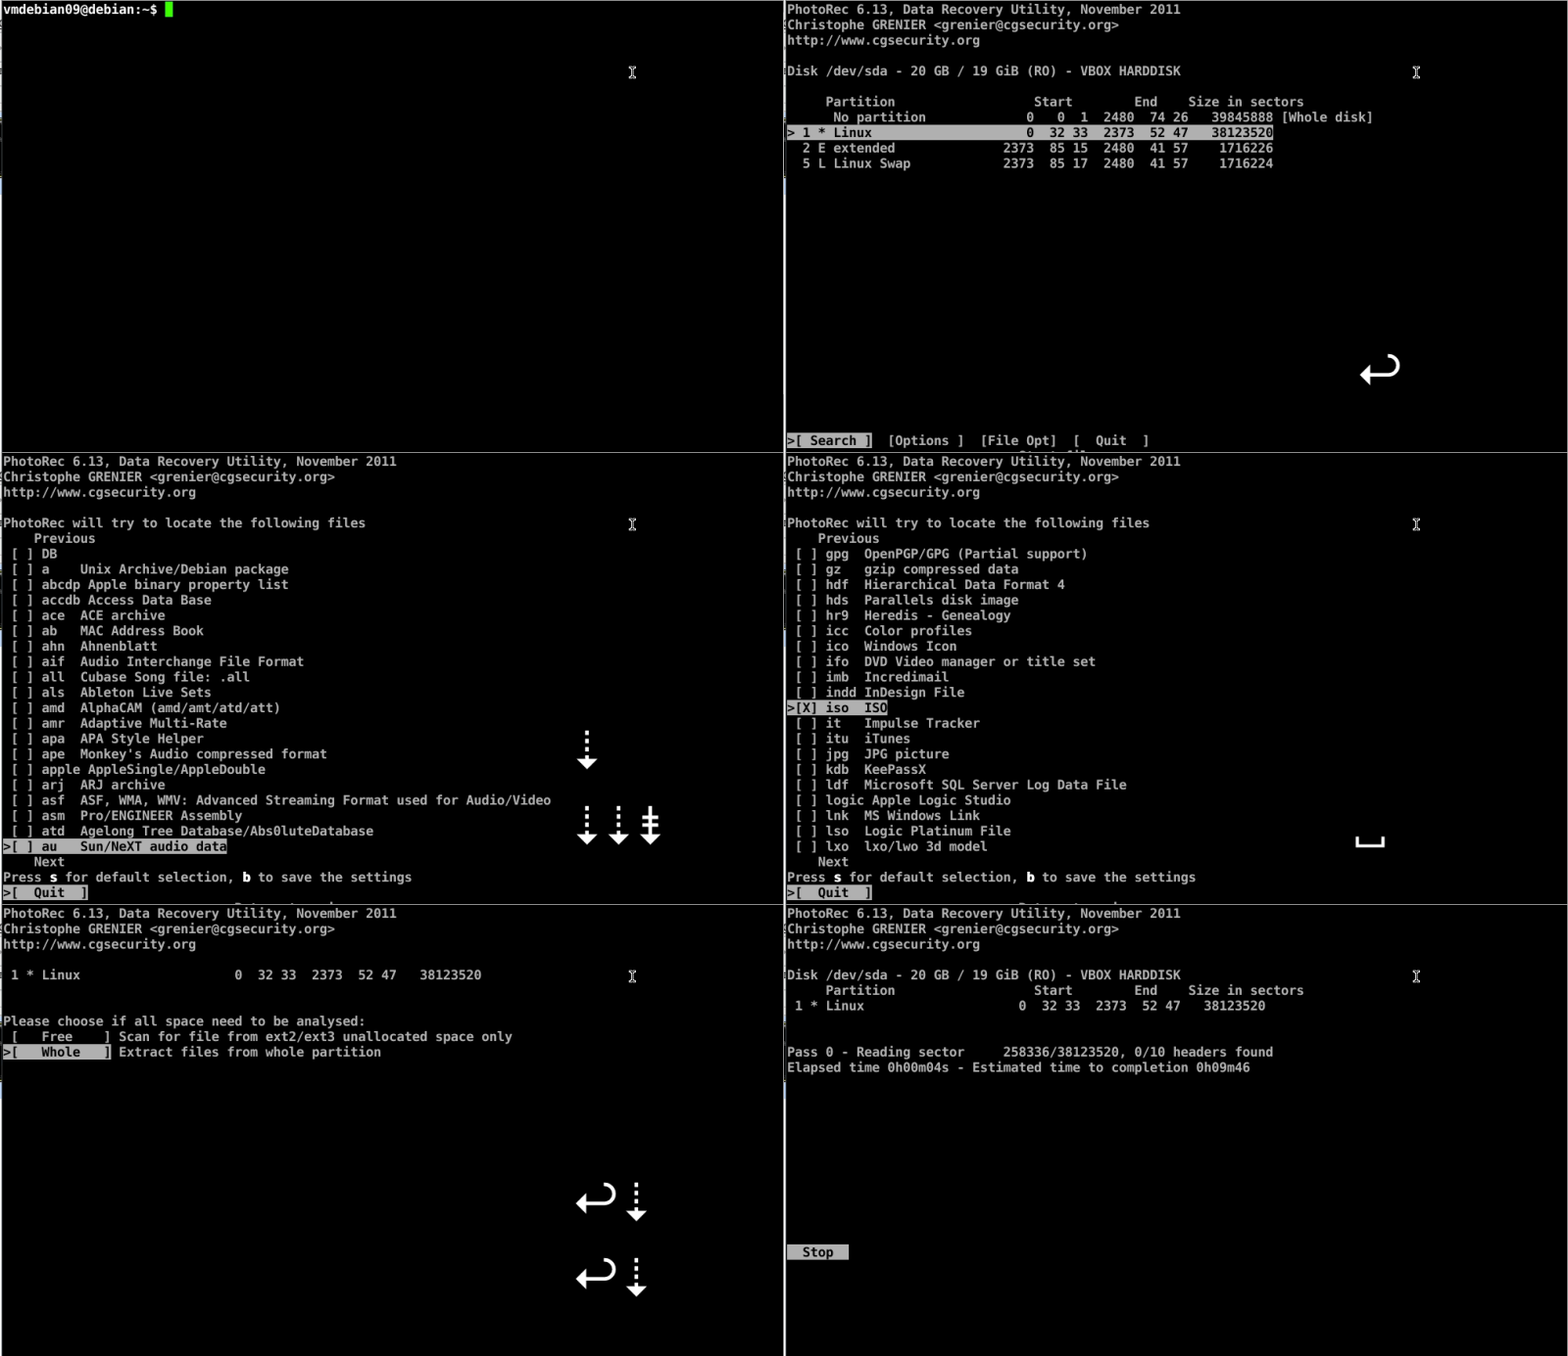
18593934593_38fdf011f0_o.gif

Figure 3: Workflow of PhotoRec in Debian 7.8


Creative Commons License
This work is licensed under a Creative Commons Attribution-NonCommercial-ShareAlike 4.0 International License.

Image sources:

  • The PhtoScape X icon from the Homepage, COPYRIGHT (C) 2001-2015 MOOII TECH ALL RIGHTS RESERVED.
  • The GIF Brewery icon from Homepage, © GIF Brewery.
  • The Flickr icon from Wikipedia, © Flickr.
  • Other icons used in images are from simpleicon, Copyright © 2014 Free Icons.

Created: 2015-07-04 Sat 12:56

Emacs 24.3.1 (Org mode 8.2.10)

Wednesday, July 1, 2015

[Telegram] File sharing

File sharing with Telegram

File sharing with Telegram


이 문서는 e[ ⎋Esc ]m[ ⌥Meta ]a[ ⌥Alt ]c[ ^Ctrl ]s[ ⇧Shift ] org-mode로 작성된 글입니다.


System Environments

Operating Systems

  • Main- : OS X Yosemite (10.10.4)
  • Sub- : Debian GNU/Linux Wheezy (7.8)
  • Server: Debian GNU/Linux Wheezy || Squeeze
  • Mobile: iOS 7.1.2

Telegram은 보안과 편의성을 함께 갖춘 몇 안되는 메신저이다. GUI(Graphic User Interface)또한 Whatsapp이나 Apple의 Messages 비교해 봐도 전혀 손색없고, iOS, Android는 물론 OSX, Windows, Linux등 주요 OS를 모두 지원한다. 나는 세벌식 사용자라, Desktop용 App을 지원해서 세벌식 자판을 쓸 수 있다는 점이 특히 마음에 든다. 한국 사람이라면, 이제 모르는 사람은 없을 것이니 Telegram에 대한 더 자세한 설명은 생략한다.

Images from https://github.com/zhukov/webogram

이번에는, 그동안 두리뭉실하게 사용해왔던 Telegram의 또 다른 강력한 기능인 "파일 공유" 에 대해서 정리해 보려 한다.

Telegram의 파일 공유 사용법은 너무 직관적이라 설명할 것도 없지만, 몇 가지 기억할 사항이 있다.1

  • 모든 형식의 파일을 보낼 수 있으나, 파일 한 개의 용량은 1.5GB로 제한된다.
  • 사진, 음악, 동영상은 그 형식에 따라 Desktop App이나 Mobile에서 바로 볼 수 있다.
  • 용량이 큰 파일을 주고 받을 때는, Telegram Web App을 쓰는 것을 추천한다.
  • 한 번 올린 파일은 따로 지우지 않는 한, 서버에 계속 남아있고 쉽게 찾을 수 있다.
  • 업로드/다운로드 속도가 생각만큼 느리지 않다.

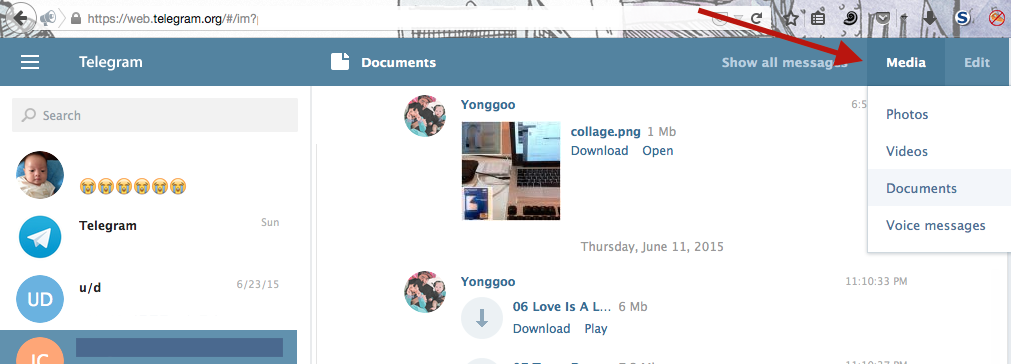
다른 OS의 Desktop App에서는 모르겠지만, OSX에서는 지원되는 형식의 사진, 음악, 동영상 이외의 파일의 경우 다운로드가 불가능하였다. 아이폰에서 하자니 용량도 크고 느리고 나중에 Desktop으로 옮겨야 하는 데다가, 완료 후 Cache 지우는 것도 귀찮아서 다른 방법이 없을까 하다가, Telegram Web App을 발견했다. 처음에 요구하는 Passcode만 Mobile이나 이미 설치한 다른 Desktop App에서 받은 후, 로그인하면 바로 사용할 수 있다. 아래 사진에서 보듯이, 가장 위의 오른쪽에서 두 번째 [Media] 를 클릭하면, 그동안 공유한 모든 파일을 한눈에 볼 수 있다. 훌륭하다.

18711295863_361be8fe7a_o.png

Figure 1: Firefox에서 Telegram Web App 사용 모습

FYI) 정확한 이유를 모르겠는데, 나름 강력하다는 보안 플러그인들이 설치되어 있는 내 Firefox에서도, 한 번 로그인하면 수동으로 로그아웃하지 않는 한 계속 로그인 상태를 유지한다는 점을 기억해 두자.


Creative Commons License
This work is licensed under a Creative Commons Attribution-NonCommercial-ShareAlike 4.0 International License.
Footnotes:

1

자세한 부분은 다음을 참조하였다. https://telegram.org/blog/shared-files


Created: 2015-07-01 Wed 22:12

Emacs 24.3.1 (Org mode 8.2.10)