Thursday, August 27, 2015

Sound issue in HandBrake

Sound breaking in HandBrake

Sound breaking in HandBrake


This post is written with e[ ⎋Esc ]m[ ⌥Meta ]a[ ⌥Alt ]c[ ^Ctrl ]s[ ⇧Shift ] org-mode.


Operating System Environments

  • Main- : OS X Yosemite (10.10.5)
  • Sub- : Debian GNU/Linux Wheezy (7.8)
  • Server: Debian GNU/Linux Wheezy || Squeeze
  • Mobile: iOS 7.1.2

HandBrake is a GNU Licensed free-/open-source for transcoding videos. It is the one and only software to me for the purpose of converting movies w/ or w/o subtitles. Main features are

  • Pros :
    • Free-/open-source
    • Cross-platform meaning available in OS X, Linux, and Windows
    • Supporting most common containers for input sources, such as .avi, .mkv, .mov, etc
    • Particularly useful for making a subtitled video
    • Queue for pending jobs
  • Cons :
    • .srt works only for a subtitle file
    • Too many options, so that could be unclear for beginners

The last disadvantage would not be a big deal, since HandBrake's built-in presets could be mostly enough. But, the inconvenience of subtitle files requires some efforts, which may be a next post. It has been installed on my two operating systems for last five years. The most frequent job of mine is to get a .m4v movie containing multi-lingual subtitles. Never fails so far.

I don't want to describe its technical details or steps how to use in this post, because there are plenty of them. Instead, fixing a sound problem probably caused during converting procedure is what I try to show here.

Sound missing after transcoding

There was a sound problem occurring for the first time. I tried to transcode a source to a .m4v movie with English/Korean subtitles. After transcoding was done, output's sound broke. Precisely, the first 2/3 part was of stereo as intended, but the remainder became mono, so that it played without any sound on my poor linux machine. Everything else was fine. Details of the input source was

  • Input source
    • Container: mp4
    • Video codec: H264 MPEG-4 AVC
    • Audio codec: MPEG AAC Audio
    • Resolution: 1920x1080
    • Size: about 1.5 GB

I attempt to use other softwares for fixing it, for example, ffmpegX, Adapter, MPEG Streamclip, QuickTime Player, even iMovie with various different configurations. However, none of them was working. (FYI, it is neither to be expected getting a subtitled .m4v output directly from any, nor even possible. I got suspicious of the input source, so that made a detour as a mid-step.)

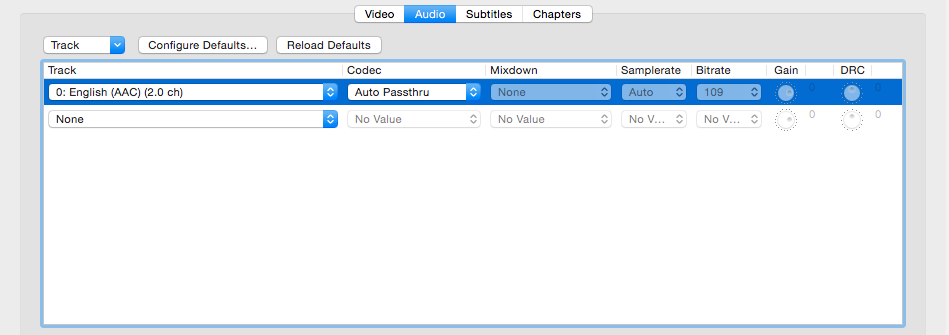
There are lots of options we can set up in HandBrake. It turns out that one of them is the key to resolving the sound issue. The audio setup that Auto Passthru is chosen as the following figure can bypass the issue, so that provides a proper stereo sound smoothly.

20290925573_8d42ac8f3c_o.png


Creative Commons License
This work is licensed under a Creative Commons Attribution-NonCommercial-ShareAlike 4.0 International License.

Created: 2015-08-27 Thu 02:53

Emacs 24.3.1 (Org mode 8.2.10)

Friday, August 21, 2015

Incognito

Chrome Incognito by default

Chrome Incognito by default


이 문서는 e[ ⎋Esc ]m[ ⌥Meta ]a[ ⌥Alt ]c[ ^Ctrl ]s[ ⇧Shift ] org-mode로 작성된 글입니다.


System Environments

Operating Systems

  • Main- : OS X Yosemite (10.10.5)
  • Sub- : Debian GNU/Linux Wheezy (7.8)
  • Server: Debian GNU/Linux Wheezy || Squeeze
  • Mobile: iOS 7.1.2


Google Chrome의 Incognito mode는 Privacy Mode의 다른 말로써, 이용 내역을 저장하지 않고 브라우저를 사용하는 기능이다. 방문한 페이지의 내역(history), http 정보(cookie), 프록시 서버 저장된 정보(web cache) 등이 저장되지 않아서 개인 정보 노출에 민감한 경우에도 유용하게 쓸 수 있다.

in‧cog‧ni‧to |inkɑ́ɡnitòu┃-kɔ́ɡ-|

[형용사][부사] 《라틴어》 익명의[으로], 가명의[으로]; 암행의[으로]

> an incognito traveler 신분을 숨긴 여행자.

[명사] (『복수』 incognitos |-z| )

1.익명자; 미행자. 2.[불]미행. 3.익명, 가명.

from OSX 내장 뉴에이스 영한사전

Private Mode를 쓰는 방법은 간단하다. Chrome(or Chromium)에서는 주소창 맨 오른쪽에 위치한 20549413899_b021ba717f_o.png를 클릭한 후, New Incognito Window 에서 사용할 수 있고, Firefox(or Iceweasel)에서도 역시 주소창 맨 오른쪽의 20549413899_b021ba717f_o.png를 클릭, New Private Window 에서 할 수 있다.

20710485986_6d901c96bb_o.gif

Figure 1: Mozilla Firefox Private Mode in OSX

최근에 보안상의 이유로 메인컴인 OSX Yosemite에서 Adobe Flash를 완전히 삭제하면서, 부득이하게 가끔 Flash가 필요할 때가 생겼다. 때문에, Flash가 브라우저에 내장된 Google Chrome을 설치해서 종종 쓰는데, 여기에서는 어떤 extensions도 설치하지 않고 순정으로 쓰고 있다. 그래서 쓸 때마다 Incognito Mode를 활성화하는 데, 너무 귀찮아서 "항상 incognito로 켤 순 없을까?"하는 고민을 하게 되었다. 이 포스팅에서는 Chrome을 열 때 항상 Incognito Mode를 활성화 하는 방법을 기술하려 한다. 기술적으로는 Bash(Terminal.app in OSX, Terminal emulator, etc in Linux)에서 --args --incognito 옵션으로 Chrome을 실행하는 것과 다름없는데, 이를 OS 마다 적당히 적용해서 사용을 더 간단하게 하는 것이 목적이다.

Open Google Chrome always with Incognito mode

테스트에 사용한 Google Chrome 버전과 OS는 아래와 같다.1

  • 44.x (64-bit) in OSX Yosemite
  • 44.x (64-bit) in Debian GNU/Linux Wheezy with XFCE

Google Chrome은 이미 설치했다고 가정한다.

OSX Yosemite

여기서 사용한 방법을 간단히 기술하면, Bash(Terminal.app)에서 open -a /Applications/Google\\ Chrome.app --args --incognito 를 실행하는 Apple Script를 만들어 Application으로 등록하는 것이다.

Instruction

  1. /Applications/Utilities 아래에 있는 Script Editor.app 을 연다.
  2. 아래를 적어 넣는다.
    do shell script "open -a /Applications/Google\\ Chrome.app --args --incognito"
    
  3. 메뉴에서 Export 를 클릭해서, [Export As:]에서 적당한 이름을 적고, [Where:]에서 /Applications 을 선택한 후, [File Format:]을 Application 으로 해서 저장한다.

이제, /Applications 아래에 새롭게 만든 Application이 등록된 것을 확인할 수 있다. 원한다면 Get Info (단축키 ⌘i)에서 아이콘도 바꿀 수 있다. 이제 원래 있는 Google Chrome이 아니라, 본인이 직접 이름 지은 새 Application을 쓰면 된다.

20744281801_54d04f59e6_o.gif

Figure 2: Workflow of Script Editor for making the application

Debian GNU/Linux

Google Chrome을 설치했다면 Bash(Terminal Emulator or etc)에서 google-chrome --args --incognito 명령을 실행하는 것으로 바로 Incognito Mode로 Chrome을 열 수 있다. 여기서는 /opt/google/chrome 아래에 있는 Shell Script인 google-chrome 을 수정하려 한다. 당연히, 사용자는 root 권한이 있어서 sudo 명령어를 쓸 수 있어야 한다.

Instruction

  1. Bash(Terminal Emulator or etc)를 열어 /opt/google/chrome/ 로 이동한다.
    $ cd /opt/google/chrome
    
  2. sudo 와 함께 적당한 에디터로 google-chrome 을 연다. 아래는 mousepad 로 실행한 예이다.
    $ sudo mousepad google-chrome
    
  3. 아래와 같이 적힌 부분을 찾자. 다른 부분은 건드리지 않게 주의한다!
    # Make sure that the profile directory specified in the environment, if any,
    # overrides the default.
    if [[ -n "$CHROME_USER_DATA_DIR" ]]; then
      # Note: exec -a below is a bashism.
      exec -a "$0" "$HERE/chrome"  \
        --user-data-dir="$CHROME_USER_DATA_DIR" "$@"
    else
      exec -a "$0" "$HERE/chrome"  "$@"
    fi
    
  4. 여기서 중요한 부분은 두 군데 있는 exec -a "$0" "$HERE/chrome" 이다. 아래와 같이, 두 곳 모두 exec -a "$0" "$HERE/chrome" --args --incognito 로 고친 후 저장하자.
    # Make sure that the profile directory specified in the environment, if any,
    # overrides the default.
    if [[ -n "$CHROME_USER_DATA_DIR" ]]; then
      # Note: exec -a below is a bashism.
      exec -a "$0" "$HERE/chrome" --args --incognito  \
        --user-data-dir="$CHROME_USER_DATA_DIR" "$@"
    else
      exec -a "$0" "$HERE/chrome" --args --incognito  "$@"
    fi
    

이제, Bash에서 google-chrome 명령어로 직접 열든, 어딘가 이미 등록되어 있는(보통 Applications Menu 아래) Google Chrome을 클릭하던, 항상 --args --incognito 옵션으로 실행되어 Incognito Mode로 열릴 것이다.


Created: 2015-08-21 Fri 22:53

Emacs 24.3.1 (Org mode 8.2.10)