Showing posts with label emacs. Show all posts

Sunday, October 18, 2015

Tags disappear after saving a buffer in emacs

Tags and Emacs

Tags and Emacs


This post is written with e[ ⎋Esc ]m[ ⌥Meta ]a[ ⌥Alt ]c[ ^Ctrl ]s[ ⇧Shift ] org-mode.


System Environments

Operating Systems

  • Main- : OS X Yosemite (10.10.5)
  • Sub- : Debian GNU/Linux Wheezy (7.9)
  • Server: Debian GNU/Linux Wheezy || Squeeze
  • Mobile: iOS 9.0.2

Softwares mentioned here

Tags disappear after saving a buffer in emacs, OS X

If your tags disappear sometimes, I bet you are an emacs and OS X user like me. It could happen under your .emacs file manually (il-)modified, particularly the backup file configuration.

It turns out that the reason why my tags disappear is caused by emacs. My il-modified .emacs had the following elisp code inside.

(setq backup-directory-alist `(("." . "~/.emacs.d/auto-save-list")))

That made all automatically generated backup files, i.e. file_name.extenson~, moved into the directory ~/.emacs.d/auto-save-list. I set it up, because file_name.extenson~ was nothing but bothering me. If an original file has a tag, then its emacs backup is gonna have the same tag as well. Whenever I tried to access such files via tags such as quicksilver's File Attribute Plugin, emacs backups also are there. Even further worse. So I decided to move them all to one directory by the elisp code above. However it was a wrong choice. According to this, a file with tags had its tags killed after saving it(^x ^s or ⌘s) in emacs.

I don't know why or how it technically happens, but it is true that the above elisp is the reason. Instead of putting all emacs backups to one directory, I simply disable all automatic backup precess by adding the following into my .emacs.

(setq backup-inhibited t)

There will be no tags disappearing again.


Creative Commons License
This work is licensed under a Creative Commons Attribution-NonCommercial-ShareAlike 4.0 International License.

Created: 2015-10-18 Sun 22:56

Emacs 24.3.1 (Org mode 8.2.10)

Friday, June 5, 2015

Emacs 24

Emacs 24

Emacs 24


이 문서는 e[ ⎋Esc ]m[ ⌥Meta ]a[ ⌥Alt ]c[ ^Ctrl ]s[ ⇧Shift ] org-mode로 작성된 글입니다.


System Environments

Operating Systems

  • Main- : OS X Yosemite (10.10.3)
  • Sub- : Debian GNU/Linux Wheezy (7.8)
  • Server: Debian GNU/Linux Wheezy || Squeeze
  • Mobile: iOS 7.1.2

Emacs Cocoa 24.3 & GNU Emacs 24.3

우선 Emacs 버전부터 짚고 넘어가자.

현재(<2015-06-04 Thu>) Debian GNU/Linux Wheezy에서 debian repository에 저장되어 있어서 apt 로 설치할 수 있는 GNU Emacs는 23.4이다. OSX Yosemite에서 돌아가는 Aquamacs 최신 버전은 3.2이고, 이는 Emacs 24를 기본으로 하고 있다. OSX에서 사용할 수 있는 또 다른 Emacs fork인 Emacs Cocoa는 두 가지 경로를 통해 설치할 수 있다. 하나는 Homepage를 이용하는 것이고, 다른 하나는 MacPorts나 Homebrew 같은 package manager를 쓰는 것이다. Emacs Cocoa Homepage에서 제공하는 가장 높은 버전은 24.5이고 Homepage: Other versions에서는 아래로 23.2까지 다운로드 가능하다. MacPorts 이용자는 Debian의 apt 처럼 최신 버전만 설치할 수 있는데, 이는 24.5이다. 지난 Posts에서도 언급했다시피, Hunspell을 이용한 영/한 맞춤법 검사 를 구현하고자 하는 사용자는 반드시 24.3이나 그 이하 버전을 써야만 이 블로그에서 설명한 방법을 적용할 수 있다.

이번에는 조금 더 구체적으로, Emacs 24.3을 기준으로 그 특징과 Debian에서 설치 방법을 적어볼 생각이다.

Upgrade org-mode

그 전 버전과 차별화되는 Emacs 24의 특징은, marmalade같은 외부 package repository를 사용할 필요 없이 자체적으로 Emacs에 필요한 package를 설치하고 또 설치한 package를 업그레이드할 수 있다는 점이다. Emacs에 기본적으로 설치된 org-mode package를 통해서 어떻게 이를 진행하는 지 살펴보자.

How to upgrade

OS 와는 상관없이 Emacs 24에서 아래의 순서로 진행하면 된다. 단축키는 OSX Emacs Cocoa의 경우를 기준으로 썼고, Debian에서 GNU Emacs 경우는 괄호 안에 기본 표현으로 표기하였다.

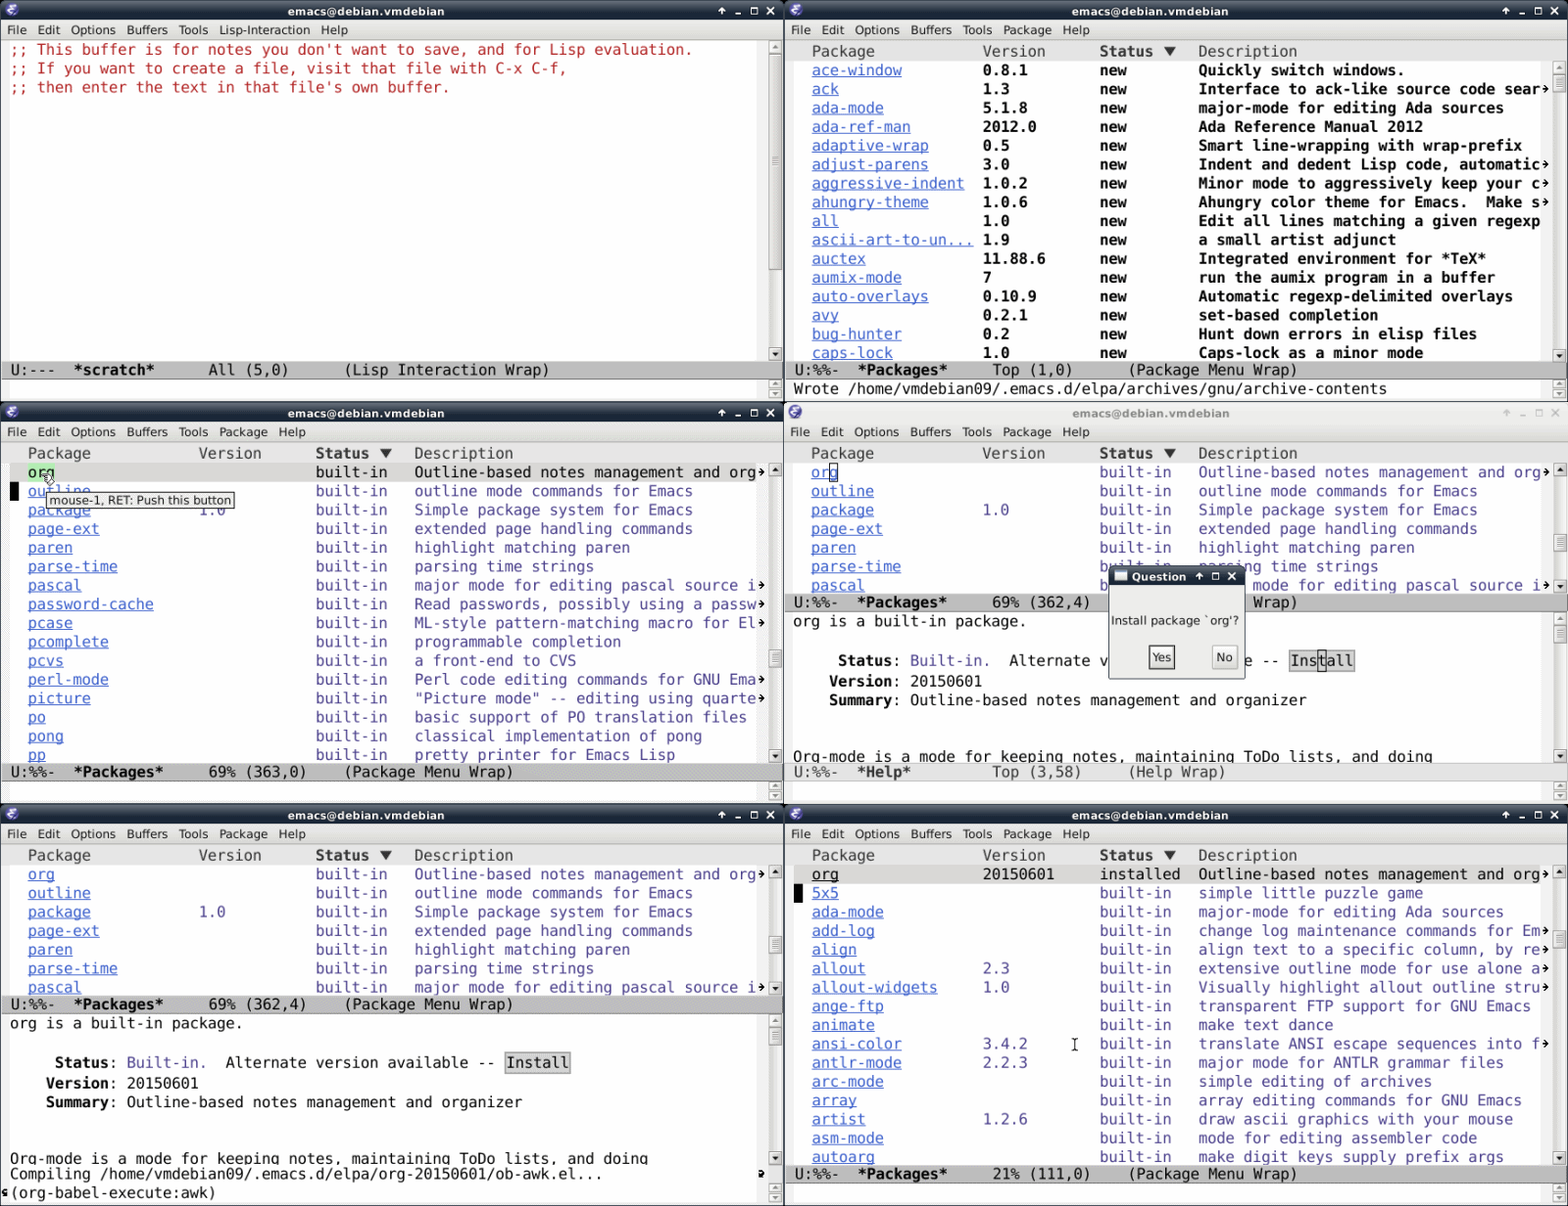
  1. Emacs에서 ⌥x (M-x)을 친 후, package-list-packages 쓰고 ↩Return
  2. 세 번째 열 Status에서 가능한 (available) packages와 설치된 (built-in) packages를 볼 수 있다. 이 중 org 를 찾아 클릭한다.
  3. 다음에 등장하는 buffer에서 Install 을 클릭해서 설치하면 끝

18469818431_854726cf90_o.gif

Figure 1: Upgrading org-mode in GNU Emacs 24.3

Trouble shooting

가끔 문제가 발생하는데, 이는 사용자가 Emacs 설정 파일인 ~/.emacs 를 이미 수정해서 쓰는 경우나 marmalade같은 외부 package repository를 사용한 상황에서 주로 발생한다.

  1. Emacs 설정 파일인 ~/.emacs 를 적당한 곳에 백업해 두자.
  2. ~/.emacs.d/ 로 이동해서 elpa 이름의 디렉토리를 지우자. 이동은 Bash (혹은 Termianl)에서 해도 되고, Finder (혹은 Dolphin, Thunar, etc)에서 해도 된다.
  3. Emacs를 실행해서 위의 과정을 다시 한다.
  4. 백업해둔 Emacs 설정 파일을 다시 ~/.emacs 로 복사한다.
  5. 이제 Emacs를 다시 실행하자.

Emacs 24.3 in debain

설치 과정은 여기를 참고했다.1 아래의 명령들을 Bash (혹은 Terminal)에서 순서대로 실행하자.

$ sudo apt-get install ttf-inconsolata build-essential xorg-dev libgtk2.0-dev libjpeg-dev libgif-dev libtiff-dev libncurses-dev autoconf
$ wget http://ftp.gnu.org/pub/gnu/emacs/emacs-24.3.tar.gz
$ tar xvfz emacs-24.3.tar.gz
$ cd ~/emacs-24.3
$ ./configure
$ make
$ sudo make install

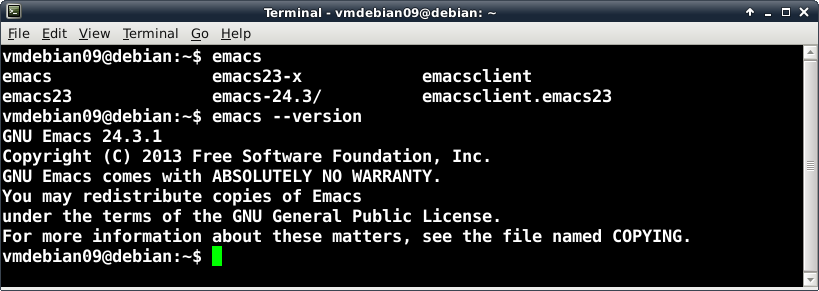
wget 으로 받은 emacs-24.3.tar.gz 파일은 홈디렉토리(~) 아래에 있으니 나중에 지워도 무방하다. 설치가 끝나면 Bash (혹은 Termianl)에서 emacs 까지만 치고 자동 완성을 위해 ↹Tab 키를 두 번 정도 치면, emacs란 이름으로 시작하는 가능한 모든 명령어를 볼 수 있다. 이미 설치했던 emacs 23은 emacs23 으로 바꾸어 있고, 새로 설치한 24는 표면적으로 없는 것처럼 보인다. 하지만 emacs 가 바로 emacs 24이다. 이는 emacs --version 명령어로 확인할 수 있다.

18467159295_4a02b21b93_o.png


Creative Commons License
This work is licensed under a Creative Commons Attribution-NonCommercial-ShareAlike 4.0 International License.
Footnotes:

Created: 2015-06-05 Fri 00:18

Emacs 24.3.1 (Org mode 8.2.10)

Wednesday, June 3, 2015

Emacs Spell-checker English/Korean

Emacs Spell-checker English/Korean

Emacs Spell-checker English/Korean


This post is written with e[ ⎋Esc ]m[ ⌥Meta ]a[ ⌥Alt ]c[ ^Ctrl ]s[ ⇧Shift ] org-mode.

이 문서는 e[ ⎋Esc ]m[ ⌥Meta ]a[ ⌥Alt ]c[ ^Ctrl ]s[ ⇧Shift ] org-mode로 작성된 글입니다.


System Environments

Operating Systems

  • Main- : OS X Yosemite (10.10.3)
  • Sub- : Debian GNU/Linux Wheezy (7.8)
  • Server: Debian GNU/Linux Wheezy || Squeeze
  • Mobile: iOS 7.1.2

Ispell-word and the secondary click within Flyspell on

Needless to say, the GIF below is self-explanatory.

English/Korean spell-checker in Emacs 24.3, OS X

The work-flow was captured under Hunspell with Emacs Cocoa 24.3 in OSX. Hunspell was activated for English/Korean. Shortcuts I set are ⌘d for ispell-word and ⌘2⌘2 for the spell-checking pop-up window. For the former, you can select a word you want by typing a digit. The latter is technically nothing but the secondary click(or right click) at a mouse point on a word underscored by Flyspell On. I made the key-binding for it by ⌘2⌘2. Though the gif above shows way in Emacs Cocoa under OSX, it is completely possible in GNU Emacs under Linux.

FYI) ⌘⎵ in the gif indicates the shortcut I set for ispell-change-dictionary.

Requirements

  • Hunspell for Emacs cocoa 24.3 in OSX or for GNU Emacs 23.4/24.3 in Debian GNU/Linux

It is not dealt with in this post, because I explained it already. You can see the details by clicking one of the links followed.

There are descriptions for a simple way to change both input methods and hunspell dictionaries as well.

Instruction

Typing ispell-word after ⌥x (M-x in typical Emacs notation) would be enough for some users to check spelling. However, what I want to say is how to set up a key-stroke for the spell-checking pop-up window once the flyspell is on.

  1. Set flyspell-mode on for text-mode by adding the line
    '(text-mode-hook (quote (turn-on-flyspell text-mode-hook-identify)))
    

    into your Emacs preference file, i.e. ~/.emacs. For instance,

    (custom-set-variables
    ;; custom-set-variables was added by Custom.
    ;; If you edit it by hand, you could mess it up, so be careful.
    ;; Your init file should contain only one such instance.
    ;; If there is more than one, they won't work right.
    '(cua-mode t nil (cua-base)) ;;<--- let c-x c-c c-v work
    '(text-mode-hook (quote (turn-on-flyspell text-mode-hook-identify))) ;;<--- flyspell
    )
    

    The basic to read an elisp source is that anything after ;; is a comment, so that doesn't affect Emacs at all.

  2. Activate ⌘2⌘2 for the secondary click(or right click) at an underscored word by adding the following elisp code to ~/.emacs
    ;; \\\\\\\\\\\\\\\\\\\\\\\\\\\\\\\\\\\\\\\\\\\\\\
    ;; \\\\\[Body III-a.] For keyboard strokes for spelling check
    ;; \\\\\\\\\\\\\\\\\\\\\\\\\\\\\\\\\\\\\\\\\\\\\\
    (global-set-key [\s-mouse-2] 'flyspell-correct-word)   ;; <--- step 0/2 for s-2 s-2
    ;; ------------------------------
    ;; ---> function 1
    ;; ------------------------------
    (defun make-mouse-event-at-point (base-event)
    (let ((posn (posn-at-point))
      (prefix "")
      (basic-type (event-basic-type base-event))
      (modifiers (event-modifiers base-event)))
    (cond
    ((and (integerp basic-type) (>= basic-type ?0) (<= basic-type ?9))
    ;; click
    (let* ((mouse-type (intern (format "%smouse-%d" prefix (- basic-type ?0))))
           (click-count 1)
           (type (event-convert-list (append modifiers (list mouse-type)))))
      (list type posn click-count)))
    (t
    (error "Unsupported key for mouse event: %s" (event-basic-type base-event)))
    ))
    )
    ;; ------------------------------
    ;; ---> function 2
    ;; ------------------------------
    (defun simulate-mouse-event-at-point ()
    (interactive)
    (let ((event (make-mouse-event-at-point last-input-event)))
    (setq unread-command-events (cons event unread-command-events))))
    ;; ------------------------------
    ;; ---> function 3
    ;; ------------------------------
    (defvar simulate-mouse-event-map (make-sparse-keymap))
    (global-set-key (kbd "s-2") simulate-mouse-event-map)   ;; <--- step 1/2 for s-2 s-2
    ;; ------------------------------
    ;; #####!!! final step, i.e step 2/2 for keyboard stroke for mouse#-click
    ;; ------------------------------
    (define-key simulate-mouse-event-map [t] 'simulate-mouse-event-at-point)
    

    When you use the exactly same elisp above in GNU Emacs under Linux, the shortcut must be ⊞Win-2 ⊞Win-2 in a non-apple keyboard. If you want to change it to C-2 C-2, then it can be done after replacing s- and \s- with C- and \C- respectively.

FYI) In GNU Emacs under Linux, C, M, S, and s stand for Ctrl, Meta, Shift, and super-key (a.k.a. Windows key) respectively.

Acknowledgement

I acknowledge Gilles from StackExchange's debt to almost every elisp code here. You can find his source code explicitly in HERE.

Epilog, 한글 사용자를 위하여

Emacs에서 맞춤법 검사는, ⌥x (M-x Emacs 기본 표기) 후 ispell-word 로 간단히 실행할 수 있다. Flyspell mode(틀린 맞춤법에 밑줄 그어짐)이 켜있는 경우에는, 밑줄 그어진 단어 위에서 우클릭하면 팝업창이 뜨고 화살표키로 선택하는 방법으로도 사용할 수 있다. 영어의 경우는 특별한 사전을 설치하지 않아도 바로 검사할 수 있음은 물론이다. 한글 맞춤법 검사는 현재로는 hunspell이 거의 유일무이한 대안인데, 영어와 함께 이를 활성화 하는 방법은 지난 Posts에서 설명했다.

OSX Yosemite 전까지는 Aquamacs에서 ispell-word (or ispell-region)으로 영어/한글 맞춤법 모두를 해결해 왔었다. 바람입력기로 OSX 차원이 아닌 Aquamacs 자체에서 입력소스를 변경하고, 영어 맞춤법은 Aquamacs에서 기본으로 제공하는 것으로 한글 맞춤법은 OSX 차원에서 설치한 Korean hunspell dictionary로 약간은 변칙을 써왔었다. 당시에도 Aquamacs에서 Hunspell을 동작하게 하는 방법을 많이 시도했으나 다 무위로 돌아갔었고, 이 변칙 방법으로도 잘 작동하니 문제 없이 사용했었다. 물론, OSX 단에서 설치한 이 한글 사전은 Aquamacs는 물론 다른 프로그램에서도 잘 돌았었다.

OSX Yosemite 후, 모든 것이 달라졌다. OSX 단에서 설치한 한글 사전은 어디에서도 제대로 동작하지 않았다. BACK TO THE MAC에서 항상 추천하는 한글 맞춤법 검사기 "단디" 역시 나에게는 해당 사항이 없었다. 왜냐하면, 단축키를 지정해도 Emacs던 Aquamacs던 동작하지 않고, 설혹 가능해도 단순히 확인할 수 있을 뿐 수정은 직접 해주어야 하는 점 때문이다. 나에게는 Hunspell이 필요했다.

모든 문제의 시작은 Hunspell임을 직감하고, 어떻게 해도 이를 활성화 할 수 없었던 Aquamacs를 포기하고 Original GNU Emacs에 가장 가깝다고 하는 Emacs Cocoa로 전환하기로 결정했다. 다행히, OSX Yosemite Emacs Cocoa에서 Hunspell을 쓰는 방법을 찾았다. (Linux에서 GNU Emacs로 hunspell 이용은 사실 자명하다.) 이는 위에서 언급한 지난 두 글에서 자세히 설명했지만, 핵심은 OS 마다 적절한(?) Emacs version을 써야 하는 점이다. 그러면 문제 해결은 비교적 간단하다.

언제나 그렇듯이, 한글이 항상 문제(?)다. 어지간히 Emacs에서 한글을 써본 사람은 다 알겠지만, Linux를 제외한 OS에서 OS 단에서 제공하는 한/영 변환은 항상 문제를 일으키므로, Emacs 자체에서 제공하는 입력 소스 변환을 쓰는 것이 항상 추천된다. 이는 OSX Yosemite에서도 바람입력기를 통해 간단히 해결할 수 있다. Hunspell을 Emacs에서 쓸 수 있게 된다 하더라도 문제는 크게 두 가지가 남아있다.

첫째, ⌥x (M-x Emacs 기본 표기) ispell-word*Choices* buffer 에서 한글이 잘린다

한글 잘림 in *Choices* buffer

이는 한글과 영어를 다른 크기로 지정함으로써, 어느 정도 해결 가능하다. 아래는 영어는 Anonymous Pro 10으로, 한글은 HCR Dotum LVT 16으로 만든 경우이다.

;; Setup different font family and size for English/Korean
(setq default-frame-alist
      '(
	(top . 0) (left . 182) (width . 96) (height . 36)   ---> window position and size
	))
(when (eq system-type 'darwin)
  (set-face-attribute 'default nil :family "Anonymous Pro")
  default font size (point * 10)
  (set-face-attribute 'default nil :height 195)
  (set-fontset-font t 'hangul (font-spec :name "HCR Dotum LVT-16"))
  )

이렇게 하면 한글 폰트 크기가 전반적으로 바뀌면서, *Choices* buffer 에서도 한글이 잘리지 않는다. 두벌식 사용자라면, ispell-word 단축키만 따로 지정해도 적당히 쓸 만한 환경을 구축할 수 있다.

나는 세벌식390 사용자다. 문제가 심각해졌다. Emacs 자체 입력 소스를 설정하면 한글 세벌식 입력 환경에서 *Choices* buffer 안에서 단어 선택이 안된다. Emacs 자체 입력 소스를 끄고, OSX 입력 소스를 쓰면 *Choices* buffer 안에서 단어 선택은 되지만, ⌥x 같은 Emacs 단축키가 안먹는다!!! 어떤 세벌식을 쓰는 지와는 무관하게 세벌식 모두(보통, 390, 최종)에서 다 안된다. 이는 Yosemite 이전에 Aquamacs (Aquamacs 2.5x 이하 버전) 사용 시는 발생하지 않는 문제였다.이 문제를 해결하기 위해서 Flyspell-mode에서 마우스 우클릭하면 팝업창이 뜨는 것에 착안, 이를 키보드로 쓸 수 있는 방법을 여기서 기술했다. 이 방법은 당연하게도 두벌식이든 세벌식이든 상관없다. 게다가 ispell-word 를 쓸 때에도 불만이었던, "화살표키로 단어선택이 안되던 문제"에서 자유롭다. 가능한 한 키보드로 모든 것을 해결하려는 이들에게 숫자키로 가는 손가락은 화살표키보다 불편하다.

지난 글과 여기에서 설명하려한 방법의 목적을 다시 정리하자면, " 어떤 한글 입력 방법을 쓰던 상관 없이 Emacs에서 맞춤법 검사 과정 전부를 키보드로 해결하자! "이다. Emacs 버전을 타는 경향이 있지만, 이는 OSX 전반은 물론 Debian GNU/Linux에서도 큰 수정 없이 바로 쓸 수 있는, 현재로써는 가장 완벽한 해결책이다.


Creative Commons License
This work is licensed under a Creative Commons Attribution-NonCommercial-ShareAlike 4.0 International License.

Created: 2015-06-04 Thu 11:21

Emacs 24.3.1 (Org mode 8.2.10)

Saturday, May 30, 2015

Hunspell for Emacs in Debain

Hunspell for Emacs in Debain

Hunspell for Emacs in Debain


This post is written with e[ ⎋Esc ]m[ ⌥Meta ]a[ ⌥Alt ]c[ ^Ctrl ]s[ ⇧Shift ] org-mode.


System Environments

Operating Systems

  • Main- : OS X Yosemite (10.10.3)
  • Sub- : Debian GNU/Linux Wheezy (7.8)
  • Server: Debian GNU/Linux Wheezy || Squeeze
  • Mobile: iOS 7.1.2

Hunspell and Emacs in Debian GNU/Linux

Debian GNU/Linux Wheezy doesn't have Hunspell preinstalled, but does GNU Emacs by all means. The version of the default emacs in the system is 23.4.1, which can be seen under Bash with emacs --version. I have testified not only the default version of Emacs, but the manually compiled 24.3.2 version as well. The following will work for both.

Using hunsepll for GNU Emacs in Debian GNU/Linux is much simpler than that in OSX, because all needs can be easily installed and configured via Debian repositories, i.e. apt. Here a English-Korean multilingual environment is taken as an example.

Additionally, dictionary-toggling in Emacs will be also at issue of this post.

Installation and configuration

  1. Get necessary packages: Open Bash, and run
    $ sudo apt-get install hunspell hunspell-ko hunspell-en-us
    
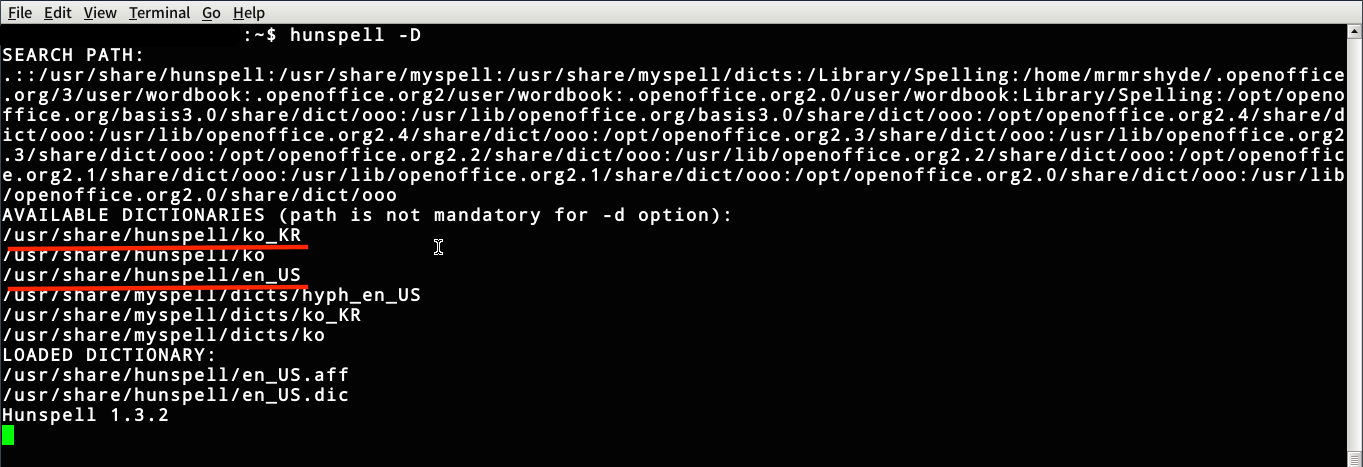
  2. Check detailed information of Hunspell:
    $ hunspell -D
    

    Two most important things are a) being executable with the above command and b) dictionaries you installed. The later must be en_US and ko_KR. Information could be as similar as the screenshot of mine.

    17657609743_e07000deb4_o.png

    Figure 1: Hunspell information in Debian 7.8

  3. Open the Emacs preference file, i.e. ~/.emacs and add the following elisp code into it
    (setq ispell-local-dictionary-alist
    '(
      ("english-hunspell"
       "[A-Za-z]" "[^A-Za-z]" "[0-9a-zA-Z]" t
       ("-d" "en_US")
       nil utf-8)
      ("korean-hunspell"
       ;; "[가-힝]" "[^가-힝]" "[0-9a-zA-Z]" nil   ;; <--- emacs 22 or lower
       "[가-힣]" "[^가-힣]" "[0-9a-zA-Z]" nil   ;; <--- emacs 23 or higher
       ("-d" "ko_KR")
       nil utf-8)
      ;; ("german"
      ;;  "[a-zäöüßA-ZÄÖÜ]" "[^a-zäöüßA-ZÄÖÜ]" "[']" t
      ;;  ("-d" "de_DE")
      ;;  nil utf-8)
      )
    )
    (setq ispell-program-name "hunspell"
          ispell-dictionary "english-hunspell")
    (setq ispell-really-hunspell t)   ;; <--- optional??? working w/o it in emacs(cocoa)
    

    FYI) If you wanna use a triple lingual environment such as German together, you can uncomment the last four sentences and modify a library.

Toggle two dictionaries

If you can change libraries with a single keyboard stroke, like C-\ for toggle-input-method rather than type it after M-x, it must then be great. I set the toggle for libraries by S-SPC. And it works after adding the following into ~/.emacs

;; ;; ### korean-english
(let ((langs '("korean-hunspell" "english-hunspell")))
  (setq lang-ring (make-ring (length langs)))
  (dolist (elem langs) (ring-insert lang-ring elem)))
(defun cycle-ispell-languages ()
  (interactive)
  (let ((lang (ring-ref lang-ring -1)))
    (ring-insert lang-ring lang)
    (ispell-change-dictionary lang)))
;; ### key bindings
(global-set-key (kbd "S-SPC") 'cycle-ispell-languages)

Creative Commons License
This work is licensed under a Creative Commons Attribution-NonCommercial-ShareAlike 4.0 International License.

Created: 2015-05-30 Sat 22:43

Emacs 24.3.1 (Org mode 8.2.10)

Hunspell for Emacs in OSX

Hunspell for Emacs in OSX

Hunspell for Emacs in OSX


This post is written with e[ ⎋Esc ]m[ ⌥Meta ]a[ ⌥Alt ]c[ ^Ctrl ]s[ ⇧Shift ] org-mode.


System Environments

Operating Systems

  • Main- : OS X Yosemite (10.10.3)
  • Sub- : Debian GNU/Linux Wheezy (7.8)
  • Server: Debian GNU/Linux Wheezy || Squeeze
  • Mobile: iOS 7.1.2

Hunspell and Emacs under OSX

Hunspall is one of the famous spell-checker softwares and GNU licensed. However, it is tricky to use it. Furthermore, the latest Emacs porks provided not only by Emacs Cocoa, but also by MacPorts and all Aquamacs can not be applicable to Hunspell as long as I have tried. Frankly speaking, the only way I know how to make Hunspell work in Emacs is the Emacs Cocoa 24.3.1 Installation of hunspell is done by means of MacPorts. Note that a English-Korean multilingual environment is taken in this post as an example.

Additionally, dictionary-toggling in Emacs will be at issue of this post as well.

Instruction for Hunspell in Emacs Cocoa with English-Korean under OSX

  1. It assumed that MacPorts were already installed, so that ready to use.
  2. Install Hunspell and its English library via MacPorts
    $ sudo port install hunspell hunspell-dict-en_US
    
  3. See paths for hunspell and hunspell-dict-en_US by running
    $ hunspell -D
    

    They must be /opt/local/bin/hunspell and /opt/local/share/hunspell/en_US.

  4. Download Hunspell dictionary for Korean: Homepage, download page, or "direct download"
  5. After unzipped ko-aff-dic-0.5.6.zip, locate two files ko.aff and ko.dic into ~/Library/Spelling/.
  6. Open the Emacs preference file ~/.emacs and add library-information as the following elisp
    (setq ispell-local-dictionary-alist
    '(
      ("english-hunspell"
       "[A-Za-z]" "[^A-Za-z]" "[0-9a-zA-Z]" t
       ("-d" "/opt/local/share/hunspell/en_US")   ;; <--- exact path
       nil utf-8)
      ("korean-hunspell"
       ;; "[가-힝]" "[^가-힝]" "[0-9a-zA-Z]" nil   ;; <--- emacs 22이하
       "[가-힣]" "[^가-힣]" "[0-9a-zA-Z]" nil   ;; <--- emacs 23이상
       ("-d" "/Users/JOHN/Library/Spelling/ko")   ;; <--- JOHN indicates you in OSX
       nil utf-8)
      ;; ("german-hunspell"
      ;;  "[a-zäöüßA-ZÄÖÜ]" "[^a-zäöüßA-ZÄÖÜ]" "[']" t
      ;;  ("-d" "de_DE")
      ;;  nil utf-8)
      )
    )
    

    Remember that a) you have to use exact paths ,not like ~ for your home directory and b) JOHN above must be replaced by your name in OSX. FYI) If you wanna use a triple lingual environment such as German together, you can uncomment the last four sentences and modify a library.

  7. And put the Hunspell information
    (setq ispell-program-name "/opt/local/bin/hunspell"   ;; <--- exact path in OSX 10.10
          ispell-dictionary "english-hunspell")
    (setq ispell-really-hunspell t)   ;; <--- optional??? working w/o it in emacs(cocoa)
    

Toggle libraries

It must be great to change libraries with a keyboard stroke, like ^\ (C-\ in typical Emacs notation) for toggle-input-method rather than type it after ⌥x (M-x in typical Emacs notation). I set the toggle for libraries by ⇧SPC (S-SPC in typical Emacs notation). Add the following into ~/.emacs

;; ### korean-english
(let ((langs '("korean-hunspell" "english-hunspell")))
  (setq lang-ring (make-ring (length langs)))
  (dolist (elem langs) (ring-insert lang-ring elem)))
(defun cycle-ispell-languages ()
  (interactive)
  (let ((lang (ring-ref lang-ring -1)))
    (ring-insert lang-ring lang)
    (ispell-change-dictionary lang)))
;; ### key bindings
(global-set-key (kbd "S-SPC") 'cycle-ispell-languages)

Creative Commons License
This work is licensed under a Creative Commons Attribution-NonCommercial-ShareAlike 4.0 International License.
Footnotes:

1

Exact version of the Emacs Cocoa working with Hunspell is 24.3.1. Other versions I have tested are 24.5-1, 24.4, and 23.4, which all I failed to use smoothly.


Created: 2015-05-30 Sat 21:01

Emacs 24.3.1 (Org mode 8.2.10)

Sunday, December 22, 2013

AUCTeX

LaTeX 환경: Emacs+AUCTeX

LaTeX 환경: Emacs+AUCTeX


;; =================================================
;; εμαcs is ⎋[esc]⌘[meta]⌥[alt]⌃[ctrl]⇧[shift].
;; =================================================

이 문서는 emacs org-mode로 작성된 글입니다.


Operating System Environments

  • Main- : OS X Mavericks (10.9.1)
  • Sub- : Debian GNU/Linux Wheezy (7.3)
  • Server: Debian GNU/Linux Squeeze || Lenny
  • Mobile: iOS 7.0.4

LaTeX 환경을 한마디로 하자면, Emacs(+AUCTeX) + Bash shell + a viewer 이다. 가히 최고의 조판 환경이다. Emacs를 editor로 써서 source 파일(.tex)을 편집하고, compile은 bash shell에서 하며, 완성된 문서(.pdf, .dvi, etc)는 전용(?) software로 확인하는 방식이다.

물론 많은 사람들이 LaTeX을 쓰는데 특화된 전용 softwares를 쓰기도 한다. OS X 용의 TeXShop, Linux KDE environment의 Kile, 최근에 다른 모두를 앞도하기 시작한 cross-platform의 TeXworks 등이 특히 유명하다. 이들은 모두 이 안에서 편집하고, 만들고, 볼 수 있다. 그냥 보기에는 이들 전용 softwares에 비해서, Emacs(+AUCTeX) + Bash shell + a viewer 조합이 불편해 보이는 것도 사실이다. 하지만 이 조합이 주는 장점은, 첫째 모든 editor를 emacs 하나로 통일 할 수 있고, 둘째 .pdf 전용 viewer 사용, 셋째 마우스 사용이 거의 없다는 점 등이다. 게다가 Emacs(+AUCTeX) 는 정말 강력한 LaTeX 사용 환경을 제공한다. 이 때문에 나는 Emacs에 입문하게 되었다. 현재는 LaTeX 에다가 C, FORTRAN, MATHEMATICA code, 등의 내가 쓰는 모든 source codes를 emacs 안에서 해결하고 있을 뿐만 아니라, org-mode, deft, markdown-mode 등으로 이메일, 블로그, Todos 등도 모두 emacs로 해결하고 있다.

Emacs(+AUCTeX) + Bash shell + a viewer 조합에서 OS 마다 emacs pork도 다르고 pdf viewer도 달라진다. 또한 어떤 emacs 종류를 쓰느냐에 따라 AUCTeX이 깔려있기도 하고 아니기도 하다. Shell 계를 평정한 bash shell 만은 다 같지만 OS 마다 이름이 조금씩 다르다. OS X에서는 Terminal.app이고 Debian GNU/Linux와 Kubuntu에서는 Konsole 혹은 Terminal이라고 불린다. 일단 이 환경을 완성하면, OS와는 상관없이 사용자가 실제 LaTeX를 쓰는 방법은 동일하다.

여기에 BibTeX까지 쓰면 금상첨화이다. AUCTeX과는 다르게 Emacs에서 BibTeX 사용을 위해 설치하거나 설정해야 할 일을 별로 없다. 그냥 쓰면 된다. 자세한 사용 방법은 지난 Posts를 참고하자.

BibTeX까지 쓰는 경우 간단한 문서 작성 workflow는 다음과 같다. 예를 들어, Source는 main.tex 라 하고 이 안에 적당한 BibTeX 파일이 사용되어 있으며 pdflatex 으로 compile하는 경우에

  1. Emacs의 AUCTeX mode로 main.tex 문서를 편집한 후,
  2. Bash shell에서 아래를 차례로 실행,
    $pdflatex main
    $pdflatex main
    $bibtex main
    $bibtex main
    $pdflatex main
    $pdflatex main
    
  3. 그러면 viewer에서 자동으로 바뀐 pdf 문서를 볼 수 있다.

FYI) 위의 2.에서 두 번씩 compile한 이유는 처음에 문서를 만들 때, 그리고 bibliography 를 새로 넣을 때만 필요하다. 그렇지 않은 경우는 한 번만 하면 된다.

OS X

OS X에서 TeX Live 환경 설치는 MacPorts를 사용할 경우, Bash shell(Terminal.app)에서 아래를 실행하는 것으로 끝이다.

$sudo port install texlive

다른 경우나 자세한 설치 과정은 지난 Post를 참고하자.

Aquamacs + Bash shell(Terminal.app) + Skim

Mac OS X Snow Leopard 까지는 Aquamacs + Bash shell(Terminal.app) + Preview.app 조합으로 썼는데, Lion은 안 써봐서 모르겠지만 Mountain Lion 부터 Preview.app이 LaTeX 환경의 pdf viewer로 쓰기에는 엉망이 되어서, 이제는 Aquamacs + Bash shell(Terminal.app) + Skim 조합이 최상이다.

GPL license의 Aquamacs는 현재(<2013-12-21 Sat>) Aquamacs 3 (preview 3) 을 배포하고 있지만, 한글 사용과 RefTeX 사용에 문제가 있으므로 version 2.5 사용을 추천한다. 어떤 version을 쓰냐와 관계없이 AUCTeX은 깔려있고 바로 쓸 수 있다. (-> Aquamacs 2.5 다운로드 페이지 바로 가기)

Skim은 BSD license의 .pdf (그리고 .eps) 전용 software로써 정말 가볍기 때문에 Aquamacs나 Emacs를 쓰지 않더라도 한 번 써보기를 추천한다. OS X Mavericks 출시 직후 잠시 조금 bugs가 있었으나, 현재(<2013-12-21 Sat>) 심각한 것들은 다 사라졌다. Skim을 그냥 쓰면, .tex 를 편집하여 compile 해서 .pdf 문서가 update 될 때마다 매번 update 하겠냐고 물어봐서 짜증을 유발한다. 원활한 사용을 위해 다시는 물어보지 않게 만들자. Bash shell(Terminal.app)을 열어 아래를 실행하자.

$defaults write -app Skim SKAutoReloadFileUpdate -boolean true

원래대로 되돌리려면, 아래 명령어를 실행하면 된다.1

$defaults delete -app Skim SKAutoReloadFileUpdate

다시 한번 이 조합을 언급하면,

  • Aquamacs 2.5 + Bash shell(Terminal.app) + Skim 1.4.7

Emacs(cocoa)

Emacs(cocoa) 설치는, 홈페이지에서 다운로드한 후 설치해도 되고, MacPorts를 이용해서 emacs-app port를 깔아도 된다. MacPorts 이야기는 많이 다루었으므로 지난 Posts를 참고하자.

Aquamacs와는 다르게 설정해 주어야 할 것들이 좀 있다. 우선 AUCTeX을 설치해야 한다. 그리고 RefTeX을 쓸 때 mini-buffer에 typing 하는 것들이 Emacs(cocoa)를 종료하면 다 사라지는데, 이렇게 쓰면 매우 불편하다. Bash shell에서 history를 저장하듯이 mini-buffer에서도 history를 저장하게 만들면, 다음에 쓸 때, 위/아래 화살표로 쉽게 불러올 수 있게 된다. Emacs(cocoa)와 MacPorts는 설치되어 있다고 가정하고, 다음 과정은

  1. 다음을 Bash shell(Terminal.app)에서 실행하여 AUCTeX을 설치하자.
    $sudo port install auctex
    
  2. 여기를 따라가서 전체 복사를 한 후, Desktop 폴더 아래에 savehist.el 이름의 파일을 만들어 붙여 넣고 저장한다. 아래를 Bash shell(Terminal.app)에서 실행하여 이 파일을 ~/emacs.d/ 아래로 이동시킨다.
    mv ~/Desktop/savehist.el ~/.emacs.d/savehist.el
    
  3. ~/.emacs 파일을 Emacs(cocoa)로 열어 아래를 붙여 넣는다.2
    ;; -------------------------------------------
    ;; auctex for emacs(cocoa)
    ;; -------------------------------------------
    (require 'tex-site)
    ;; -------------------------------------------
    ;; with manually chosen directory
    ;; -------------------------------------------
    (add-to-list 'load-path "~/.emacs.d/")
    ;; -------------------------------------------
    ;; enable savehist.el for saving minibuffer history in emacs(cocoa)
    ;; -------------------------------------------
    (savehist-mode 1)
    ;; -------------------------------------------
    ;; For LaTeX-mode in emacs(cocoa)
    ;; -------------------------------------------
    (add-hook 'LaTeX-mode-hook 'turn-on-reftex)   ; with AUCTeX LaTeX mode
    (add-hook 'latex-mode-hook 'turn-on-reftex)   ; with Emacs latex mode
    

FYI) MacPorts를 통해서 AUCTeX을 설치하면, tex-live를 비롯한 tex 관련 ports를 모두 재설치 혹은 업그레이드 한다. MacTeX으로 LaTeX 환경을 구성한 경우에는 위의 방법이 먹힐지 장담할 수 없다.

Debian GNU/Linux and Kubuntu

Debian GNU/Linux에서 TeX Live 환경 설치는 Bash shell(Konsole/Terminal)에서 아래를 실행하는 것으로 끝이다.

$sudo apt-get install texlive-full

다른 경우나 자세한 설치 과정은 지난 Post를 참고하자.

GNU Emacs(+AUCTeX) + Bash shell(Konsole/Terminal) + Okular

상황은 Emacs(cocoa) section과 동일하다. 날 것 그대로(?) 쓰면, AUCTeX도 깔려있지 않고, mini-buffer history도 저장되지 않는다. Emacs(cocoa) section에서의 과정을 그대로 밟으면 된다. 약간씩 명령어 같은 것이 다른데, GNU Emacs 는 설치되어 있다고 가정하고, 다음 과정은 아래와 같다.

  1. 다음을 Bash shell(Konsole/Terminal)에서 실행하여 AUCTeX을 설치하자.
    $sudo apt-get install auctex
    
  2. 여기를 따라가서 전체 복사를 한 후, Desktop 폴더 아래에 savehist.el 이름의 파일을 만들어 붙여 넣고 저장한다. 아래를 Bash shell(Konsole/Terminal)에서 실행하여 이 파일을 ~/emacs.d/ 아래로 이동시킨다.
    mv ~/Desktop/savehist.el ~/.emacs.d/savehist.el
    
  3. ~/.emacs 파일을 GNU Emacs로 열어 아래를 붙여 넣는다.
    ;; -------------------------------------------
    ;; with manually chosen directory
    ;; -------------------------------------------
    (add-to-list 'load-path "~/.emacs.d/")
    ;; -------------------------------------------
    ;; enable savehist.el for saving minibuffer history in GNU Emacs
    ;; -------------------------------------------
    (savehist-mode 1)
    ;; -------------------------------------------
    ;; For LaTeX-mode in GNU Emacs
    ;; -------------------------------------------
    (add-hook 'LaTeX-mode-hook 'turn-on-reftex)   ; with AUCTeX LaTeX mode
    (add-hook 'latex-mode-hook 'turn-on-reftex)   ; with Emacs latex mode
    

Debian GNU/Linux과 Kubuntu에는 KDE environment에 따라오는 강력한 pdf viewer software인 Okular가 있다. 아무런 설정 변경없이, 그냥 쓰면 된다.


Footnotes:

1

참고 사이트: Ref#1, Ref#2

Created: 2013-12-22 Sun 10:56

Emacs 23.4.1 (Org mode 8.0.2)

Validate XHTML 1.0

Saturday, December 14, 2013

Note in plain text

Note in plain text

Note in plain text


;; =================================================
;; εμαcs is ⎋[esc]⌘[meta]⌥[alt]⌃[ctrl]⇧[shift].
;; =================================================

이 문서는 emacs org-mode로 작성된 글입니다.


Operating System Environments

  • Main- : OS X Mavericks (10.9)
  • Sub- : Debian GNU/Linux Wheezy (7.2)
  • Server: Debian GNU/Linux Squeeze || Lenny
  • Mobile: iOS 7.0.4

시중에는 Note 관련 Apps이나 Applications이 즐비하다. OS X나 iOS 사용자라면, Apple에서 제공하는 Notes.app을 대부분 쓸 것이다. iCloud로 자동으로 sync되는 이 Notes.app은 그냥저냥 쓸 만은 하다. IT 환경에 조금 밝은 사람은 Evernote를 많이 쓴다. 이 역시 나쁜 선택은 아닐 것이다. 그럼 뭐가 불만인가? 내가 Note 관련 Apps이나 Applications에 요구하는 기능은, 한 마디로 하자면, Plain text이다.

  • Plain text는 어떤 OS에서도 완벽히 호환된다.
  • Plain text는 읽거나 수정하는데 있어 특별한 프로그램이 필요치 않다.
  • Plain text는 검색이 용이하다.

다시 되짚어 보자. iCloud는 Apple 제품에서만 쓸 수 있다. Evernote 역시 Linux 버전이 없으며 따로 iOS 버전이던 OS X 버전을 설치해야 사용이 용이하다. 물론 나도 이 글에서 어떤 프로그램을 추천하겠지만, Plain text로 작성된 문서는 기본적으로 따로 특별한 프로그램이 요구되지는 않는다는 점을 다시 한 번 강조하고 싶다.

여기서는 두 개만 예로 들었지만, Note를 표방하는 시중의 대부분의 제품의 가장 큰 문제는 검색이 엉망이라는 데 있다. 아름다운 GUI로 Note 프로그램을 잘 만들어도, 그 안에서만 검색이 가능하거나 그마저도 잘 않되는 것들이 태반이다. Note를 쓰면 쓸 수록, 쓴 글들이 database가 되어, 이를 언제라도 빠르고 쉽게 검색할 수 있어야 진정한 Note라고 부를 수 있지 않을까? 강력한 호환성을 자랑하는 문서 format은 첫째가 단연 plain text고 두 번째로는 pdf라 할 수 있겠다. 한글을 사용할 것이므로 unicode의 한 종류인 utf8으로 note를 작성하고, .txt 확장자로 저장하면 어느 OS에서도 문제 없이 사용할 수 있는 강력한 호환성을 갖게 된다.

Sync는 Dropbox로 해결할 것이다. Dropbox를 쓰는(혹은 추천하는) 가장 큰 이유는 다양한 OS를 지원하기 때문이다. OS X, Linux, Windows의 3대 OS는 물론이고 iOS, Android, BlackBerry에 Kindle Fire까지 지원한다. 또한 API가 공개되어 있어서 다양한 apps에서 접근성 또한 높다. 무료 사용자에게는 2GB 만을 제공하지만, Note 사용에는 한도 끝도 없는 용량이며, 간단한 pdf 파일들로는 일반인들은 다 쓰기도 어려운 용량이다. 어떤 editor든지 .txt 파일로 만들어서 Dropbox directory 아래에 저장만 하면 그냥 sync 된다. 인터넷만 된다면 어디서든 볼 수 있다.

Dropbox 사용의 또 하나의 강력한 장점은, 지난 번에 저장했던 같은 이름의 파일들이 Dropbox server에 고스란히 저장되어 있다는 점이다. 즉, 글을 계속 수정하고 저장해 가며 쓰다가 문득 지난 번에 쓴 표현을 되살리고 싶을 때, Dropbox homepage에 가서 그 이름의 파일에서 secondary click (aka 우클릭) 후, 'Previous versions'을 클릭하면 지난번에 저장했던 파일들이 고스란히 존재하는 것을 볼 수 있다. 시간 순서로 정렬되어 있으므로 적당한 시간대의 파일들을 몽땅 다운로드해서 확인해 보면 된다. 한 가지 주의할 점도 있다. 아직껏 Dropbox hacking 소식없지만, 그래도 기본적으로는 서버에 올리게 되는 것이므로, 개인정보에 관한 파일을 Dropbox와 함께 사용하는 것은 항상 신중해야 하고 가능하면 그런 파일은 encrypt해서 그냥 컴에만 가지고 있자.

11259796523_5099ab2db9.jpg

여기까지 정리하면, Note 관련 Apps이나 Applications에게 요구되는 기능은 다음과 같다.

  1. Plain text에 Unicode를 지원해야 한다.
  2. 가볍게 돌아가야 하고 사용이 간단해야 한다.
  3. 강력한 검색을 지원해야 한다.
  4. Dropbox sync가 용이해야 한다.
  5. Markdown 같은 markup language를 지원하면 금상첨화다.

OS X

Notational Velocity and nvALT

Notational Velocity라는 환상의 프로그램이 있다. GNU GPLv3 license의 OS X 전용의 plain text note 프로그램이다. 이 프로그램 안에서 note를 작성하는 것은 물론 검색도 해준다. 한글도 잘 동작하며, dropbox sync도 문제없다. 무엇보다도 정말 가볍고 빠르다.

Notational_velocity_screenshot.png

Notational Velocity, image from Wikipeida: Notational Velocity

기본적인 동작은 검색 필드(로 보이는)에서 모두 이루어진다.(단축키 ⌘L)

  • 여기에 단어를 쓰면 바로 검색을 해 주고, 그 단어가 포함된 notes를 모두 filtering 해서 바로 아래 panel에서 즉각 보여주며, 방향키로 검색한 단어가 포함된 notes 사이를 이동할 수 있다. 이 때 세 번째 panel에서 그 note 안에서 검색한 단어가 강조되어 표현됨은 물론이다. 다른 applications과 마찬가지로, Forward finding (단축키 ⌘G)으로는 그 note 안에서 계속적으로 그 검색 단어를 찾아준다.
  • 여기에 단어를 쓰고 엔터()를 누르면, 그 단어를 이름으로 한 다른 note를 바로 만든다.

개인적으로는 Notational Velocity의 모든 기능에 MultiMarkdown preview까지 지원하는 nvALT를 더 추천한다. Open source는 아니지만 free이다. 사용 방법 및 설정은 Notational Velocity와 완전히 동일하다. dropbox sync와 notes 관리 설정은 아래와 같다.

  1. nvAlt에서 Preferences(⌘,)를 열어 아래 그림에서 (1.)의 'Notes'를 클릭한다.
  2. (2.)를 클릭해서 Dropbox에서 sync 시킬 폴더를 선택한다. 아래 예에는 ~/Dropbox/nv 로 설정되어있다.
  3. 기본으로는 모든 notes를 단 하나의 이름의 파일로 관리하는 것으로 되이있는데, 그 아래 'Storage' panel에서 (아래 그림 (3.)) (4.)을 클릭해서 'Plain Text Files*'로 바꾸면 각기 다른 파일 이름으로 note 작성 가능하다.
  4. Markdown(.md) 파일을 nvALT에서 작성 및 검색 가능하게 하려면, (5.1)의 '+'를 클릭하여 (5.2)에 md를 추가시킨다. FYI) (5.2)의 빨간 박스를 잘 보면 txt 가 굵게 표시되어 있는데, 이건 새로 작성할 note가 .txt 로 작성됨을 뜻한다. .md 를 기본으로 하려면 그 이름을 클릭해서 굵게 표시되게 만들면 된다.

11242442566_34e7884a80.jpg

말로는 잘 설명이 안된다. free software(Notational Velocity는 free-/open-)이므로 한 번 써보는 것을 권한다. 써보면 무슨 말인지 알게 된다.

특히, Markdown 및 MultiMarkdown 사용자라면 nvALT를 한 번 써볼 것을 추천한다. Mou라는 꽤 괜찮은 OS X 전용 무료 editor가 존재하지만 nvALT도 그 못지 않다. Navtive nvALT의 Live-preview 기능을 켜고 편집을 하면 Live-preview 화면이 다시 맨 위로 올라가서 다소 부족한데, 이 또한 해결이 가능하다. 이를 위해서는 아래 사이트에 가서 Download Lopash for nvALT v1.0 를 클릭하여 다운로드 받은 후 (혹은 여기를 눌러 직접 받은 후)

압축을 풀어서, 아래 여섯개의 파일을 ~/Library/Application Support/nvALT/ 에 붙여 넣는다.

custom.css
highlight.pack.js
jquery.min.js
solarized_dark.css
solarized_light.css
template.html

그러면 아래 그림과 같은 Live-preview을 볼 수 있게 된다. 이 설정을 완료한 후, Live-preview 기능을 켜고 편집을 하면 Live-preview 화면이 다시 맨 위로 따라 올라가지 않는다.

11313128466_4c01428dca_z.jpg

FYI-#1) 같은 MultiMarkdown source로 확인해 본 결과 Mou와 nvALT가 같은 결과(html 혹은 pdf)를 보여주지는 않았다. 즉, 둘의 MultiMarkdown engine이 다른 것으로 보인다.

FYI-#2) DEVONthink 사용자라면, 위의 예에서 dropbox sync 시킨 ~/Dropbox/nv 폴더를 indexing 하면 DEVONthink 안에서도 검색할 수 있음은 물론이다.

FYI-#3) Simplenote 사용자라면, sync는 Simplenote로 해결하면 된다. Notational VelocitynvALT 모두 Simplenote를 기본으로 지원한다.

Aquamacs (or emacs) deft-mode

완전하지는 않지만 markdown-mode.el 를 만들어 배포하고 있는 Jason Blevins1Notational Velocity의 영감을 얻어 유사하게 만든 deft.el 도 만들어서 배포하고 있다.

설정하는 방법은 jblevins.org/projects/deft/에 자세한 설명이 나와있지만 간단하게 설명하면,

  1. deft.el을 다운 받아 (혹은 링크를 따라가서 전체 복사 후, Aquamacs에서 새 문서를 열어 붙여 넣고 deft.el 로 저장)
  2. deft.el 파일을 ~/.emacs.d/ 아래로 이동. 예를 들어, ~/Desktop/deft.el 으로 만든 경우에 bash sell(Terminal.app)을 열어 아래를 실행
    $mv ~/Desktop/deft.el ~/.emacs.d/deft.el
    
  3. 내 경우는 markdown도 가끔 쓰지만, 주로 org-mode를 .txt 확장자로 사용한다.

    위의 nvALT에서와 같은 폴더(~/Dropbox/nv)를 사용하고 .txt 확장자를 새 note에 기본으로, note 편집은 org-mode 에서 할 경우에는, 아래를 ~/.emacs 파일에 붙여 넣고 저장한다.

    (add-to-list 'load-path "~/.emacs.d/")
    ;; ###################
    ;; for deft.el
    ;; ###################
    (require 'deft)
    (setq deft-directory "~/Dropbox/nv")
    (setq deft-extension "txt")
    (setq deft-text-mode 'org-mode)
    (setq deft-use-filename-as-title t)
    (global-set-key (kbd "C-c d") 'deft)
    

    Markdown을 주로 쓰는 사용자라면, .md 확장자를 선호할 것이고 note 편집은 물론 markdown-mode 를 쓸 것이므로 아래를 ~/.emacs 파일에 붙여 넣고 저장한다.

    (add-to-list 'load-path "~/.emacs.d/")
    ;; ###################
    ;; for deft.el
    ;; ###################
    (require 'deft)
    (setq deft-directory "~/Dropbox/nv")
    (setq deft-extension "md")
    (setq deft-text-mode 'markdown-mode)
    (setq deft-use-filename-as-title t)
    (global-set-key (kbd "C-c d") 'deft)
    

    물론 markdown-mode 가 깔려있어야 한다. 그리고 두 경우 모두 deft-mode 를 부른 단축키는 ⌃c d 로 지정되어 있다. 수동으로는 ⌥x 누른 후, deft ↩ 하면 부르는 것과 동일하다.

FYI) deft-mode를 쓰더라도 nvALT (혹은 Notational Velocity)는 필요하다. 왜냐하면, plain text를 쓰는 이유 중의 하나인 검색이 deft-mode에서 용이하지 않다. 특히 한글 검색은 deft-mode를 부른 후, ⌥x deft-filter 과정을 거쳐야 가능하다. 그럼에도 불구하고 deft-mode를 쓰는 이유는, Finder나 Quicksilver로 찾는 것보다 Aquamacs 안에서 보고, 찾아서, 바로 편집하는 편리함 때문이다.

Any test editor + searching

물론, 원론적으로는 어떤 editor를 쓰던 상관없다. Plain text로 작성하므로 OS X에 기본으로 들어있는 TexdEdit.app을 써도 된다. DEVONthink 사용자라면 그 안에서 검색은 물론 편집도 가능하므로 아무것도 필요 없다. Markdown을 주로 쓰면 Mou를 써도 되고, Emacs user라면 Aquamacs를 쓰면 되고 뭐든 상관없다. 문제는 검색인데, 그것도 Notational VelocitynvALT (혹은 DEVONthink) 처럼 시각적으로 바로 검색 결과를 보여주는 것도 필요 없다고 생각하면, 역시 문제 되지 않는다. 처음에 얘기했듯이 plain text로 작성한 문서는 검색도 용이하기 때문이다. 즉, 다른 프로그램 없이 그냥 Finder.app에서 ⌘F 로 검색해도 되고, DEVONtechnology에서 무료로 배포하는 EasyFind를 써서 검색해도 된다. (-> EasyFind: direct link for download) Plain text로 작성했으므로 파일명 뿐만 아니라 그 안의 내용까지 잘 검색해 준다.

11259740685_3f3f4b7df6_z.jpg

in Finder.app

11259824573_2ed49be81d_z.jpg

in EasyFind

Debian GNU/Linux and Kubuntu

다시 말하지만 plain text로 note를 만드는 것은 어디에서 해도 된다. 그냥 깔려있는 Kate 같은 프로그램으로 작성해도 된다. 저장만 Dropbox directory 아래에 적당한 이름으로 하면 그냥 sync도 된다. 역시 Notes 검색이 문제인데, 단순하게는 OS X의 Finder.app처럼 KDE environment에서는 Dolphin안에서 검색을 해도 잘 되긴 한다. 하지만 조금 더 나은 검색 환경을 위해 OS X 경우처럼 다른 가능성을 살펴보겠다.

nvpy

Notational VelocitynvALT는 OS X 전용 프로그램이다. Linux에서는 여기에 영감을 얻은 Charl P. Botha가 만들고 BSD License로 배포되고 있는 nvpy가 있다. 작동하는 방식은 Notational Velocity과 거의 같다. Markdown도 지원하고 Dropbox sync도 가능하다. 한글도 모양이 좀 이상하긴 하지만 무난하게 지원된다.

  • Debian GNU/Linux와 Kubuntu에서 설치는 다음 순서로 bash sell(Konsole/Terminal)에서 실행하면 된다.2
    $sudo apt-get install python python-tk python-pip python-markdown
    $sudo pip install nvpy
    
  • Dropbox sync3 위해서는
    1. home directory 아래 .nvpy.cfg 를 만들고
      $touch ~/.nvpy.cfg
      
    2. 적당한 editor로 .nvpy.cfg 파일을 열어, 아래를 적어 넣자.
      [nvpy]
      simplenote_sync = 0
      notes_as_txt = 1
      txt_path = /home/user_id/Dropbox/nv
      

      위에서 user_id 에는 실제 사용자 ID를 적어 넣어야 한다. Dropbox 아래 nv 라는 이름의 directory와 sync 시키는 경우로 설정되어 있음에 유의하자.

  • 실행은 K-runner나 bash sell(Konsole/Terminal)에서 nvpy↩ 하면 된다.
  • 간단한 단축키로는, ⌃?: 단축키 정보 표시, ⌃N: 새 노트, ⌃M: html로 rendering. (주의 html rendering 후 저장은 따로 브라우저 안에서 해야한다.) 자세한 단축키는 여기를 가서 살펴보자.

11243974703_76d77194de_z.jpg

nvpy in Debian GNU/Linux wheezy

Markdown은 지원하는데 MultiMarkdown은 지원하지 않는다 는 점도 염두해 두자.

Emacs user

Aquamacs와 다를 것이 하나도 없다. Deft-mode를 쓰면 된다. 'Aquamacs (or emacs) deft-mode' section 에서 자세히 기술하였다.

iOS

plain text를 편집할 수 있는 어떤 app도 가능하다. Dropbox app을 쓰면 수동으로 올리고 다운받는 것도 가능하긴 하다. 하지만 이렇게 쓰면 너무 불편하다. app 안에서 dropbox sync 기능이 지원되어 그 안에서 sync를 눌러 수행하거나 인터넷에 연결되면 자동으로 수행하는 방식이 가능한 apps 위주로 간단하게 살펴보기로 하자. 아래 링크를 따라가면 정말 많은 apps의 특징들을 비교하여 표로 만들어 놓았으니, 더 많은 정보를 원하면 참고하자.

Free apps

꽤 많은 수의 무료 apps가 있는데, 그 중에 쓸만한 두 개는 WriteroomNocs이다. Writeroom은 OS X 용의 유료 application도 있는데, iOS 용은 현재(<2013-12-08 Sun>) 무료로 배포되고 있다. 자화사의 무료 app인 PlainText의 iOS 7 용의 미발매로 지금 한시적으로 무료로 배포하고 있다. 괜찮은 GUI를 가지고 있으나 Markdown preview 기능은 지원하지 않는다. Nocs는 항상 free로 배포되고 있는데, GUI가 조금 촌스럽긴 하지만 광고도 없고 Markdown도 지원하고 그럭저럭 쓸만하다. 내가 추천하는 free app이다. 그것도 아니면 Notational Velocity나 nvALT, nvpy가 default로 지원하는 Simplenote를 쓰는 것도 한 방법이다. iOS, Android, Kindle을 지원하고 OS X 용도 있다. ID를 만들고 가입하는 절차가 필요하다는 점과 Markdown은 지원하지 않는다는 점을 유의하자.

Non-free apps

아직 $4.99 가격의 평이 좋은 apps도 있다. MultiMarkdown을 지원하는 Element나 그냥 Markdown만 지원하지만 OS X 용도 있는 ByWord이 쓸만해 보인다. 어디를 가도 추천 리스트에 꼽히는 apps다. 나는 둘 다 써보지 못 해서 추천할 수는 없고, 그냥 정보 정도라고 생각했으면 한다.

Nubulous Notes

neb·u·lous
미[nébjuləs] 영[nébjuləs]
【형용사】
(격식)
1. 흐린; 구름 같은; 성운(상)의(nebular).
2. 뚜렷하지 않은(formless), 막연한(vague), 불분명한(in-distinct); 혼란한

출처: Daum 영한사전: nebulous

마지막으로 내가 쓰는 app인 Nubulous Notes이다. 살 때만 해도 $3.99 였는데, 지금은 $7.99 이어서 추천하기에는 조금 부담스러운 가격이 되었다. 그래도 기능은 정말 막강하다. Dropbox sync도 잘 되고, 전체 화면 모드도 최상단의 정보창 부분도 사라지고 꽉차는 진짜 전체 화면 모드로 지원되며, Markdown 뿐만 아니라 html rendering도 지원되서 내 경우는 org-mode에서 html로 export 한 파일을 올려서 보기도 한다. 또한 자주 쓰는 단축키(or macros)를 설정(아래 세 번째)해서 자판 위에 올릴 수 있어서(아래 두 번째) 편집이 매우 용이하다. 내 설정(macros)에서는 (두 번째 그림에서), 1. 을 누르면 '** {오늘 날짜}' 가 찍히고, 2. 를 누르면 '*** ' 가 찍히게 설정되어 있다. 또한 Fonts도 몇 깔려 있어서 원하는 것으로 선택해서 쓸 수 있다.

11313219513_e56c457f2a_z.jpg

무료로 배포되는 lite version도 있으니 한 번 써보고 구매하길 추천한다.

FYI) 언급한 다섯 apps 모두 iPhone과 iPad를 전부 지원하는 univeral app이다.

Epilog

가벼운 note 검색은 nvALTAquamacsDeft-mode로 하지만, 개인적으로는 거의 모든 검색은 DEVONthink로 하고 있다. 가격이 좀 되기 때문에 note만 쓰는데 추천하기는 애매하지만(원래 이런데 쓰라고 나온 게 아니다), 가히 database 관리의 왕이라 불릴 만한 프로그램이다. DEVONthink는 워낙 다루는 블로거들이 많으므로 난 다룰 일이 없을 것 같다.

Markdown을 꼭 쓸 필요는 없다. 나조차도 Emacs org-mode를 주로 쓰고 있다(물론 그것은 내가 Emacs 사용자이기 때문일 수 있다). 그러나 문법이 워낙 간단(?)하고 유명 apps 중에 이를 지원하지 않는 것이 손에 꼽을 정도라 언급했다.

글이라는 것을 쓰는데 자질구레한 설정이 필요 없이 글쓰기에만 집중하게 하는 컨셉의 applications이 많은데, nvALT를 그런 용도로도 쓸 수 있을 것 같다. 원래 이 글은 쓰려고 했던 동기를 주었던 프로그램이다. OS X 사용자는 한번 쯤 써볼 것을 추천한다.


Footnotes:

1

바로 이 사람이 만든 markdown-mode.el 가 Aquamacs 3.0 preview에 기본으로 들어가 있다.

2

Installation은 여기를 참고하였다.

3

Dropbox sync 관련은 여기를 참고하였다. Simplenote 사용자는 여기를 살펴보자.


Creative Commons License
This work is licensed under a Creative Commons Attribution-NonCommercial-ShareAlike 3.0 Unported License.

Created: 2013-12-14 Sat 16:56

Emacs 23.4.1 (Org mode 8.0.2)

Validate XHTML 1.0